-
Notifications
You must be signed in to change notification settings - Fork 554
docs: Scoped Variables Draft + Other Fixes (Ephemeral Doc Alignment) #3982
New issue
Have a question about this project? Sign up for a free GitHub account to open an issue and contact its maintainers and the community.
By clicking “Sign up for GitHub”, you agree to our terms of service and privacy statement. We’ll occasionally send you account related emails.
Already on GitHub? Sign in to your account
Merged
Merged
Changes from 3 commits
Commits
Show all changes
5 commits
Select commit
Hold shift + click to select a range
d4e7658
Scoped Variables Draft
ashoknayak777 27557ca
Added snapshots of widget screens
ashoknayak777 1f47eff
Deleted unwanted binary
ashoknayak777 8e862da
Admonition and Example Added
ashoknayak777 255e06c
Added List of Predefined Variables
ashoknayak777 File filter
Filter by extension
Conversations
Failed to load comments.
Loading
Jump to
Jump to file
Failed to load files.
Loading
Diff view
Diff view
There are no files selected for viewing
This file contains hidden or bidirectional Unicode text that may be interpreted or compiled differently than what appears below. To review, open the file in an editor that reveals hidden Unicode characters.
Learn more about bidirectional Unicode characters
This file contains hidden or bidirectional Unicode text that may be interpreted or compiled differently than what appears below. To review, open the file in an editor that reveals hidden Unicode characters.
Learn more about bidirectional Unicode characters
168 changes: 168 additions & 0 deletions
168
docs/user-guide/global-configurations/scoped-variables.md
This file contains hidden or bidirectional Unicode text that may be interpreted or compiled differently than what appears below. To review, open the file in an editor that reveals hidden Unicode characters.
Learn more about bidirectional Unicode characters
| Original file line number | Diff line number | Diff line change |
|---|---|---|
| @@ -0,0 +1,168 @@ | ||
| # Using Scoped Variables in Devtron | ||
|
|
||
| ## Introduction | ||
|
|
||
| In any piece of software or code, variables are used for holding data such as numbers or strings. Variables are created by declaring them, which involves specifying the variable's name and type, followed by assigning it a value. | ||
|
|
||
| Devtron offers super-admins the capability to define scoped variables (key-value pairs). It means, while the key remains the same, its value can change depending on the following context: | ||
|
|
||
| * **Global**: Variable values will be universally same for everybody in Devtron. | ||
| * **Cluster**: Variable values might differ for each Kubernetes cluster. | ||
| * **Environment**: Variable values might differ for each environment within a cluster, e.g., staging, dev, prod. | ||
| * **Application**: Variable values might differ for each application. | ||
| * **Environment + Application**: Variable values might differ for each application on a specific environment. | ||
|
|
||
| **Advantages of using scoped variables** | ||
|
|
||
| * **Reduces repeatability**: Configuration management team can centrally maintain the static data. | ||
| * **Simplifies bulk edits**: All the places that use a variable get updated when you change the value of the variable. | ||
| * **Keeps data secure**: You can decide the exposure of a variable's value to prevent misuse or leakage of sensitive data. | ||
|
|
||
| --- | ||
|
|
||
| ## How to Define a Scoped Variable | ||
|
|
||
| On Devtron, a super-admin can download a YAML template. It will contain a schema for defining the variables. | ||
|
|
||
| ### Download the Template | ||
|
|
||
| 1. From the left sidebar, go to **Global Configurations** → **Scoped Variables** | ||
|
|
||
| 2. Click **Download template**. | ||
|
|
||
| 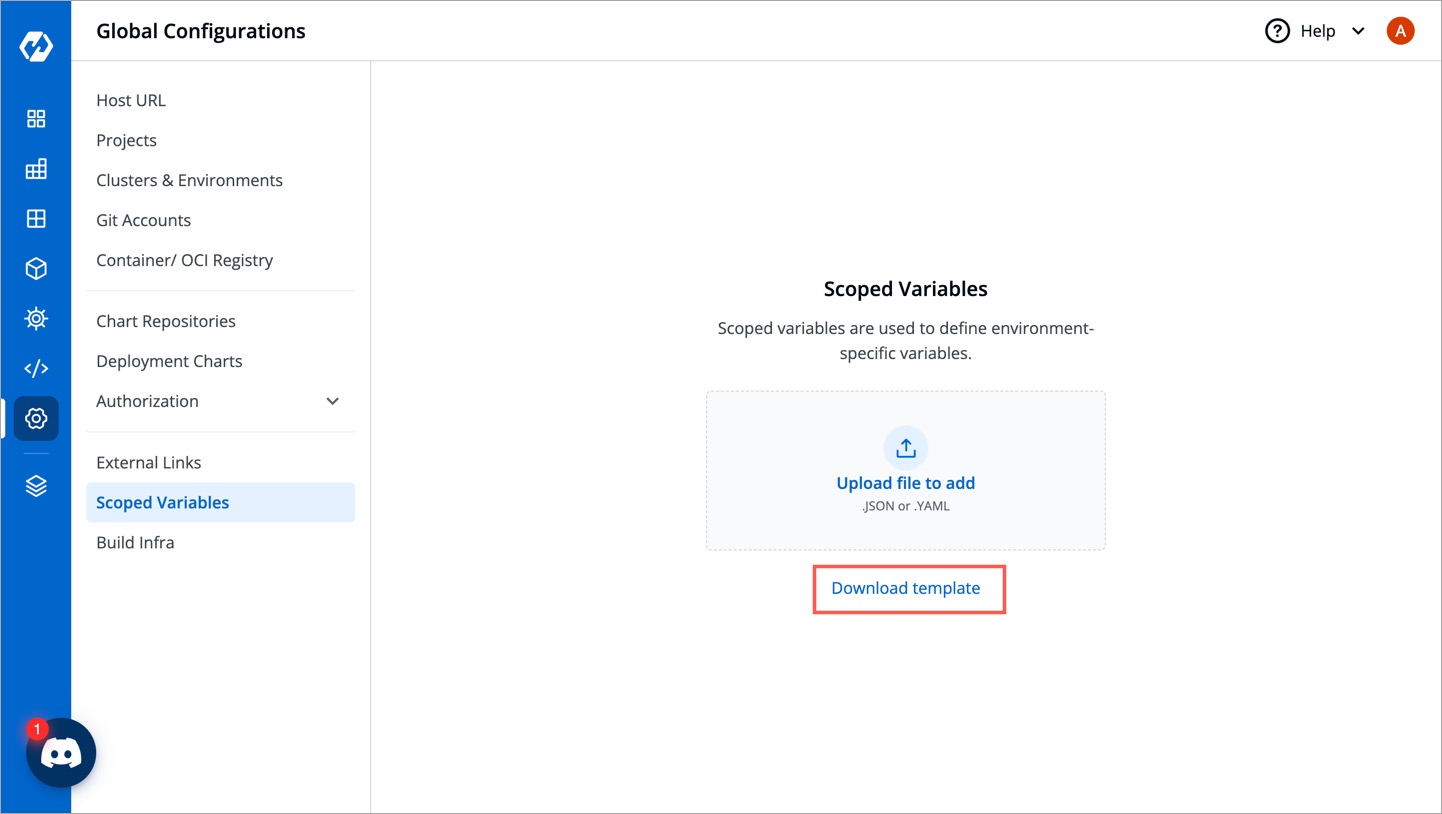 | ||
|
|
||
| 3. Open the downloaded template using any code editor (say VS Code). | ||
|
|
||
| ### Enter the Values | ||
|
|
||
| The YAML file contains key-value pairs that follow the below schema: | ||
|
|
||
| | Field | Type | Description | | ||
| | ------------------------ | ------- | ------------------------------------------------------------------------------- | | ||
| | `apiVersion` | string | The API version of the resource (comes pre-filled) | | ||
| | `kind` | string | The kind of resource (i.e. Variable, comes pre-filled) | | ||
| | `spec` | object | The complete specification object containing all the variables | | ||
| | `spec.name` | string | Unique name of the variable, e.g. *DB_URL* | | ||
| | `spec.shortDescription` | string | A short description of the variable (up to 120 characters) | | ||
| | `spec.notes` | string | Additional details about the variable (will not be shown on UI) | | ||
| | `spec.isSensitive` | boolean | Whether the variable value is confidential (will not be shown on UI if true) | | ||
| | `spec.values` | array | The complete values object containing all the variable values as per context | | ||
|
|
||
| The `spec.values` array further contains the following elements: | ||
|
|
||
| | Field | Type | Description | | ||
| | ------------------------ | ------- | ---------------------------------------------------------------------------------------------------- | | ||
| | `category` | string | The context, e.g., Global, Cluster, Application, Env, ApplicationEnv | | ||
| | `value` | string | The value of the variable | | ||
| | `selectors` | object | A set of selectors that restrict the scope of the variable | | ||
| | `selectors.attributeSelectors` | object | A map of attribute selectors to values | | ||
| | `selectors.attributeSelectors.<selector_key>` | string | The key of the attribute selector, e.g., *ApplicationName*, *EnvName*, *ClusterName* | | ||
| | `selectors.attributeSelectors.<selector_value>` | string | The value of the attribute selector | | ||
|
|
||
|
|
||
| Here's a truncated template containing the specification of two variables for your understanding: | ||
|
|
||
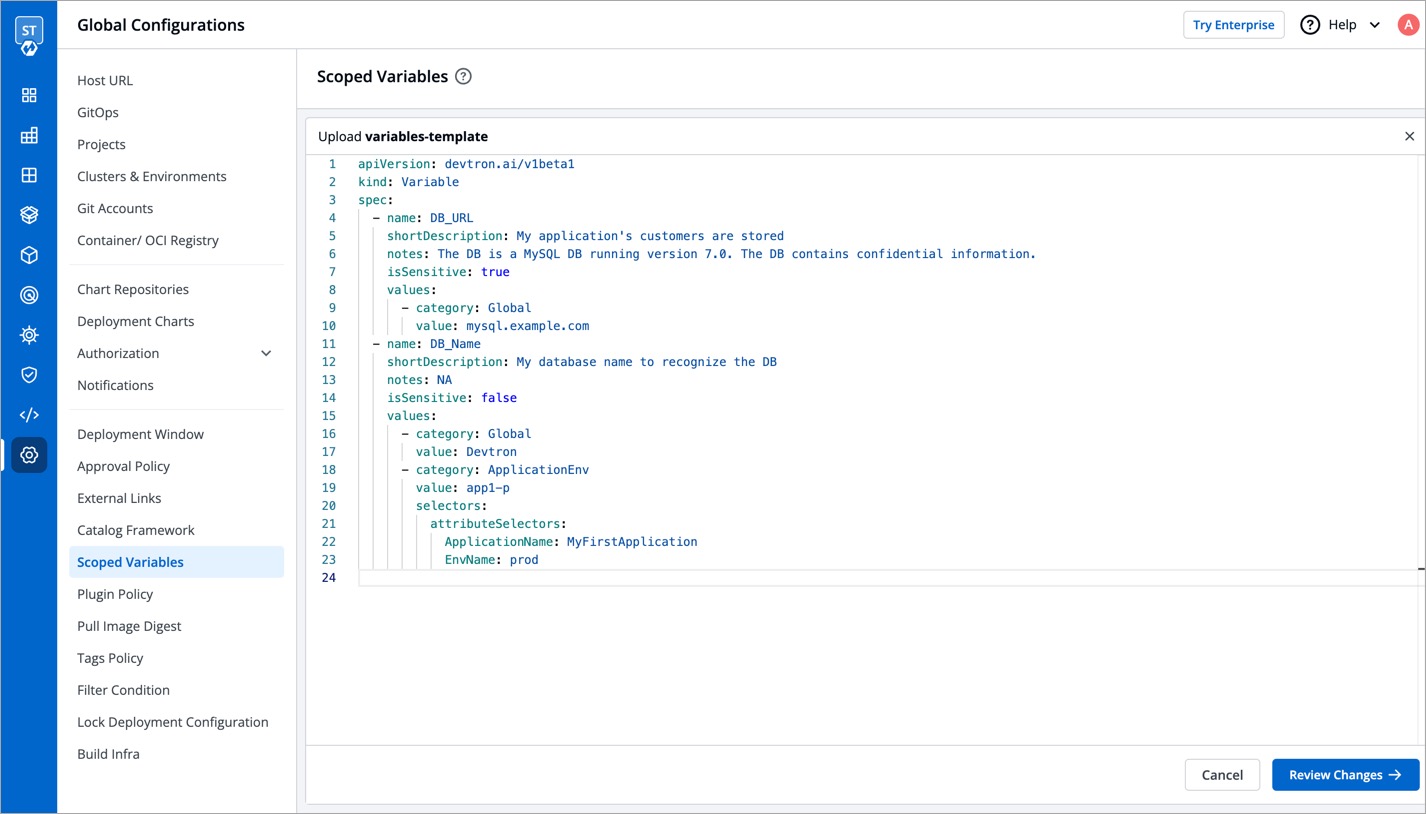
| apiVersion: devtron.ai/v1beta1 | ||
| kind: Variable | ||
| spec: | ||
|
|
||
| # First example of a variable | ||
| - name: DB_URL | ||
| shortDescription: My application's customers are stored | ||
| notes: The DB is a MySQL DB running version 7.0. The DB contains confidential information. | ||
| isSensitive: true | ||
| values: | ||
| - category: Global | ||
| value: mysql.example.com | ||
|
|
||
| # Second example of a variable | ||
| - name: DB_Name | ||
| shortDescription: My database name to recognize the DB | ||
| notes: NA | ||
| isSensitive: false | ||
| values: | ||
| - category: Global | ||
| value: Devtron | ||
| - category: ApplicationEnv | ||
| value: app1-p | ||
| selectors: | ||
| attributeSelectors: | ||
| ApplicationName: MyFirstApplication | ||
| EnvName: prod | ||
|
|
||
| ### Upload the Template | ||
|
|
||
| 1. Once you save the YAML file, go back to the screen where you downloaded the template. | ||
|
|
||
| 2. Use the file uploader utility to upload your YAML file. | ||
|
|
||
| 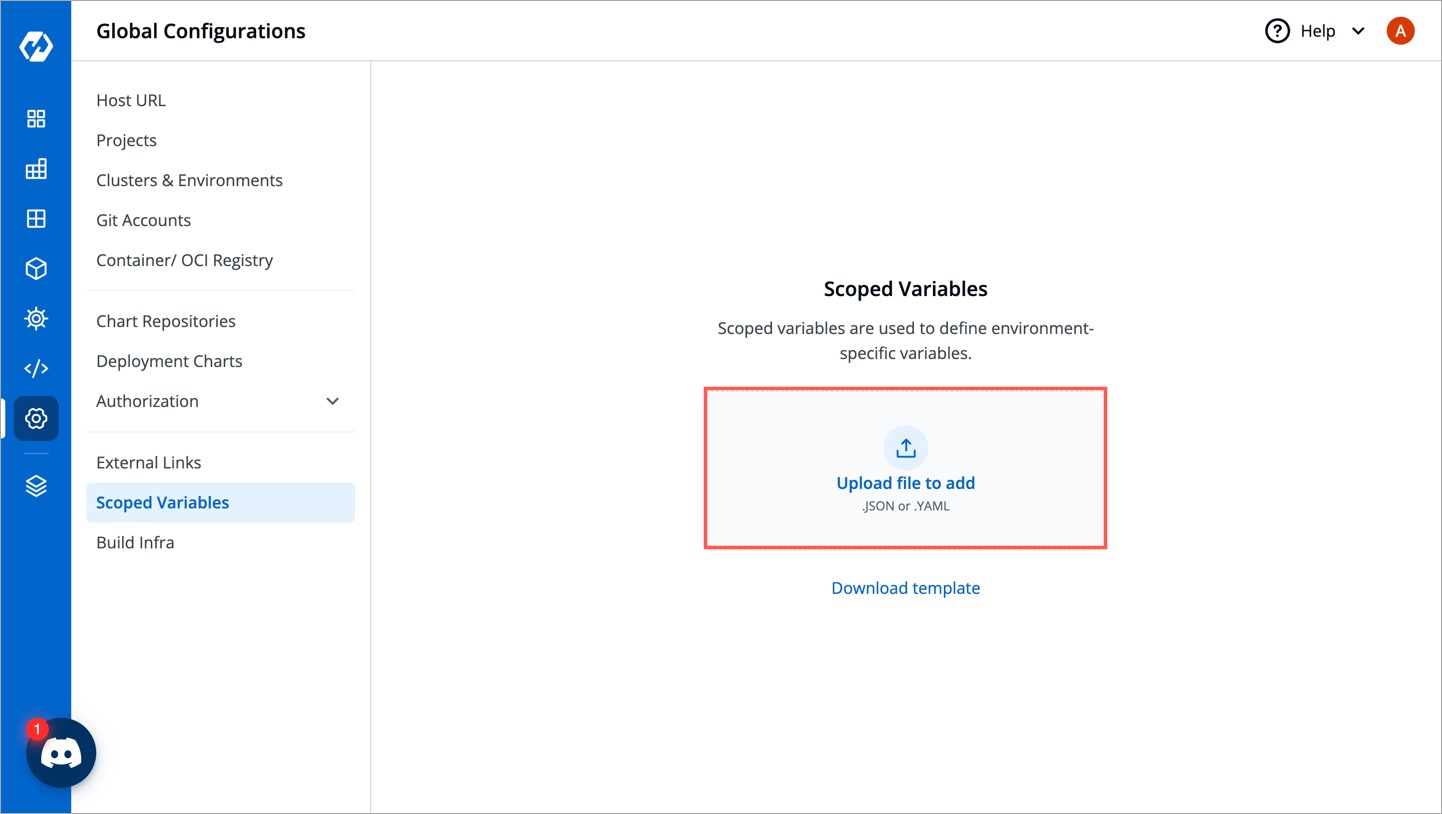 | ||
|
|
||
| 3. The content of the file will be uploaded for you to review and edit. Click **Review Changes**. | ||
|
|
||
|  | ||
|
|
||
| 4. You may check the changes between the last saved file and the current one before clicking **Save**. | ||
|
|
||
| 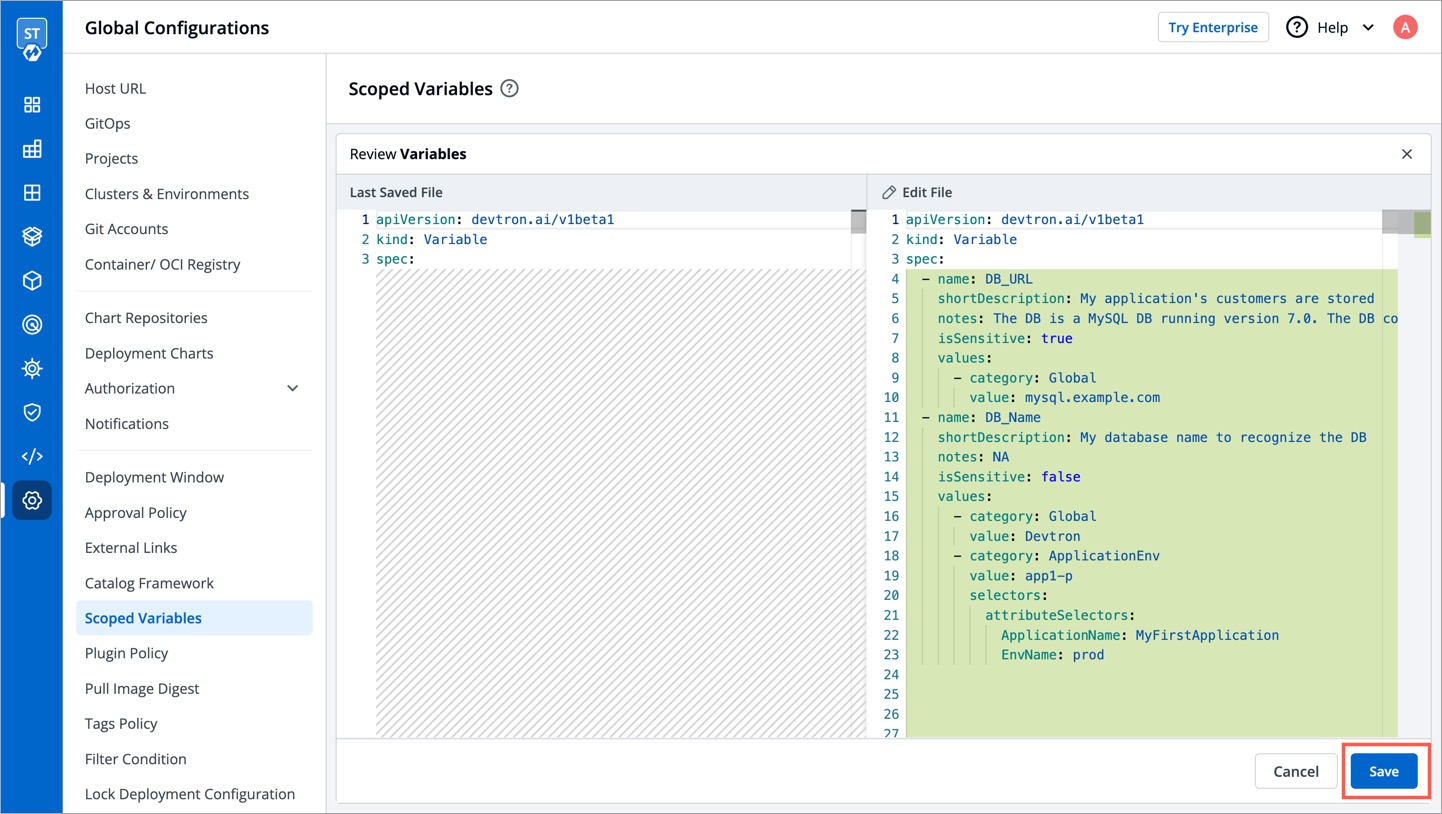 | ||
|
|
||
| 5. Click the **Variable List** tab to view the variables. Check the [How to Use a Scoped Variable](#how-to-use-a-scoped-variable) section to know more. | ||
|
|
||
| 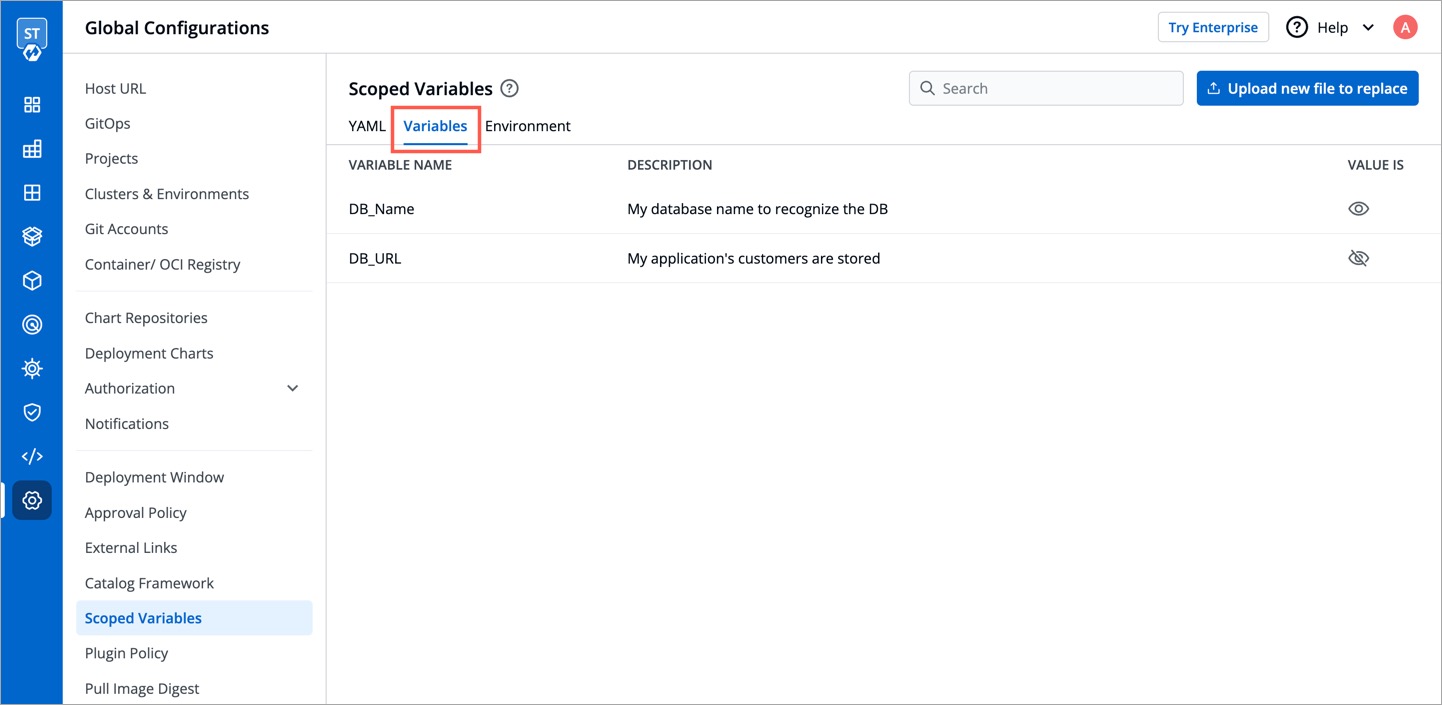 | ||
|
|
||
| --- | ||
|
|
||
| ## How to Edit an Exiting Scoped Variable | ||
|
|
||
| Only a super-admin can edit existing scoped variables. | ||
|
|
||
| **Option 1**: Directly edit using the UI | ||
|
|
||
| 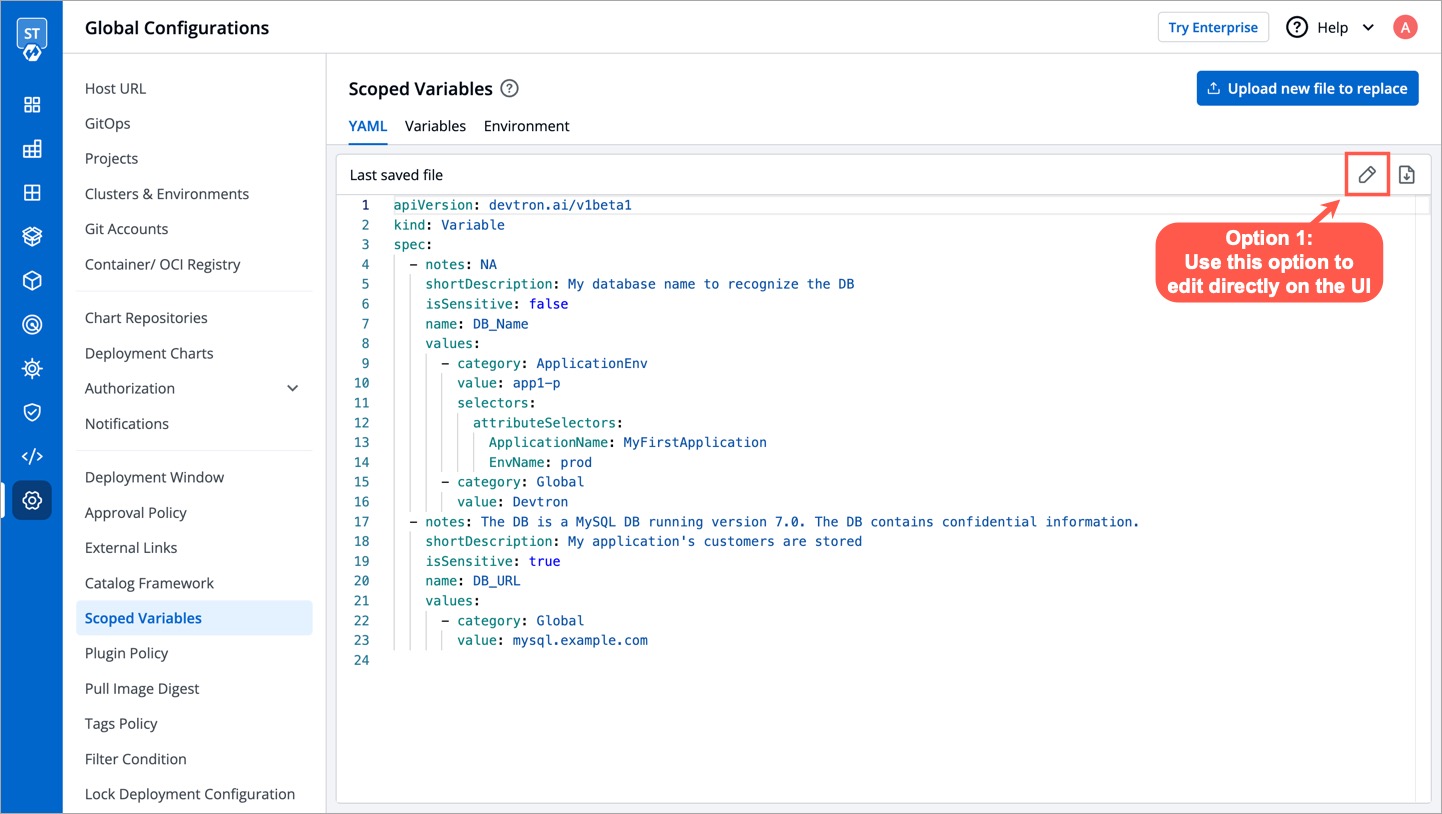 | ||
|
|
||
| **Option 2**: Reupload the updated YAML file | ||
|
|
||
|  | ||
|
|
||
| --- | ||
|
|
||
| ## How to Use a Scoped Variable | ||
|
|
||
| Once a variable is defined, it can be used by your authorized users on Devtron. A scoped variable widget would appear only on the screens that support its usage. | ||
|
|
||
| Currently, the widget is shown only on `Edit build pipeline` and `Edit deployment pipeline` screens under **App Configuration** → **Workflow Editor**. | ||
|
|
||
| 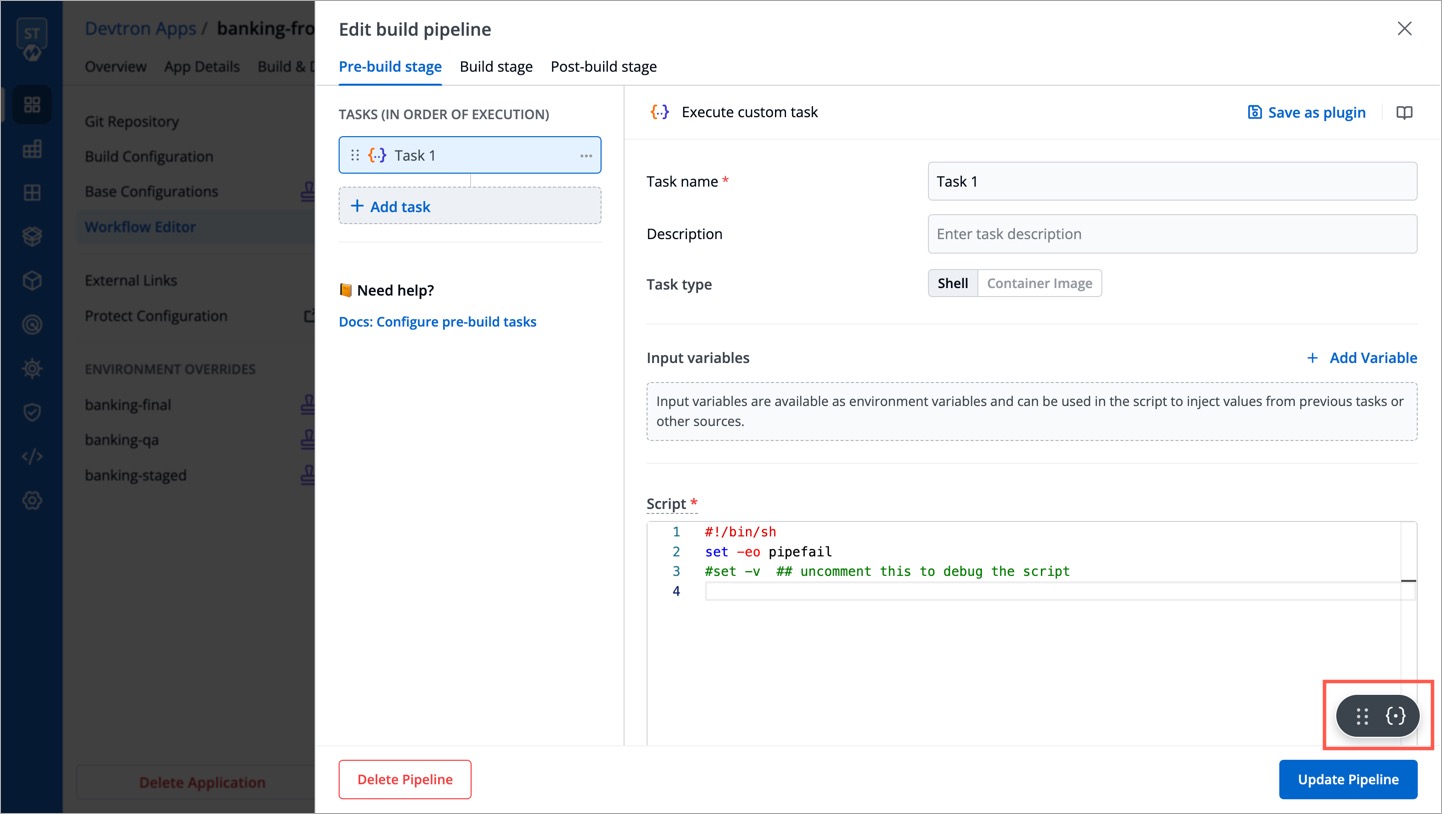 | ||
|
|
||
| Upon clicking on the widget, a list of variables will be visible. | ||
|
|
||
| 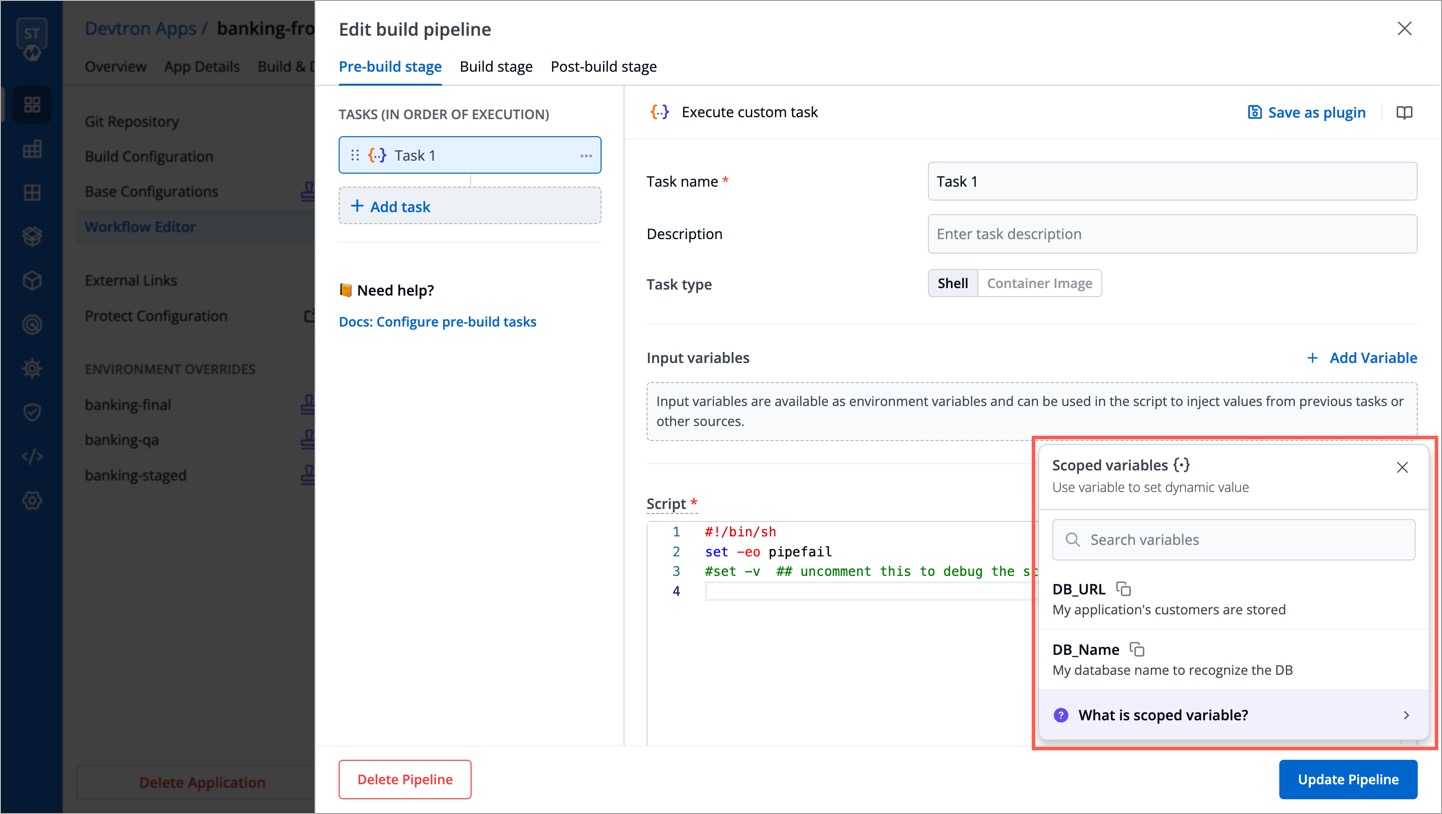 | ||
|
|
||
| Use the copy button to copy a relevant variable of your choice. | ||
|
|
||
| 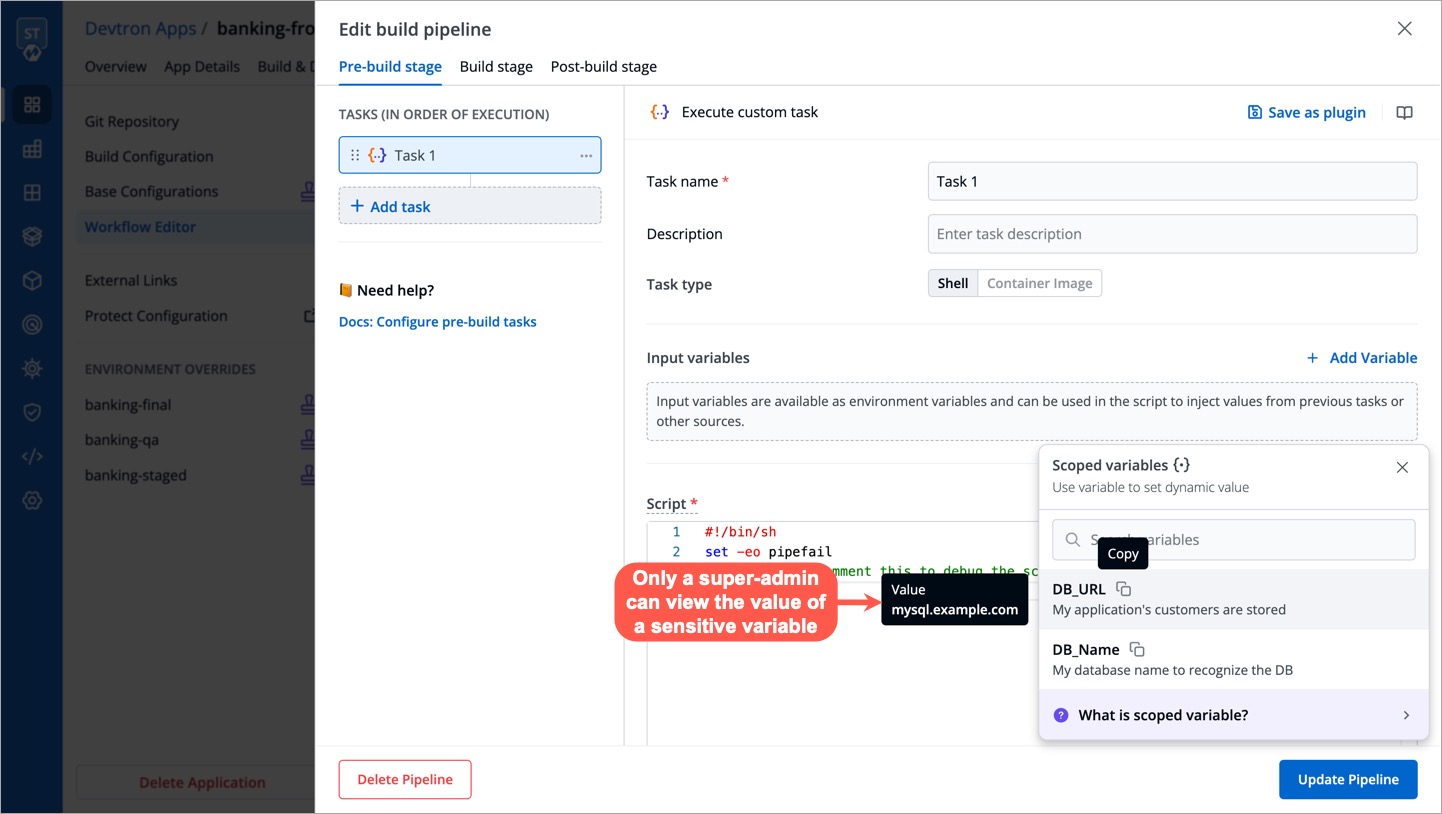 | ||
|
|
||
| It would appear in the following format upon pasting it within an input field: `@{{variable-name}}` | ||
|
|
||
| 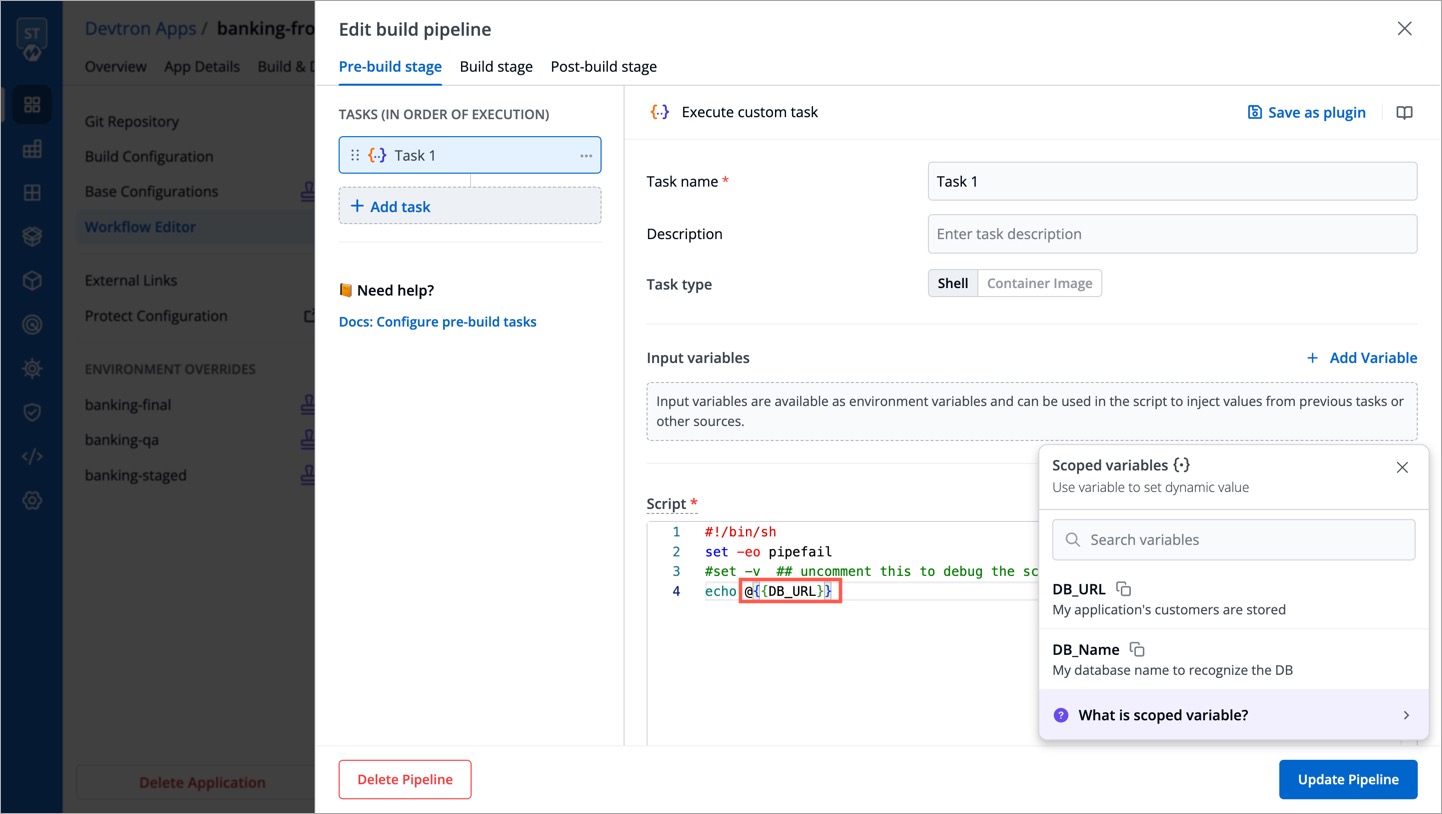 | ||
|
|
||
|
|
||
| {% hint style="info" %} | ||
| ### Order of Precedence | ||
ashoknayak777 marked this conversation as resolved.
Outdated
Show resolved
Hide resolved
|
||
|
|
||
| When multiple values are associated with a scoped variable, the precedence order is as follows, with the highest priority at the top: | ||
|
|
||
| 1. Environment + App | ||
| 2. App | ||
| 3. Environment | ||
| 4. Cluster | ||
| 5. Global | ||
|
|
||
| {% endhint %} | ||
|
|
||
|
|
||
|
|
||
|
|
||
|
|
||
|
|
||
Add this suggestion to a batch that can be applied as a single commit.
This suggestion is invalid because no changes were made to the code.
Suggestions cannot be applied while the pull request is closed.
Suggestions cannot be applied while viewing a subset of changes.
Only one suggestion per line can be applied in a batch.
Add this suggestion to a batch that can be applied as a single commit.
Applying suggestions on deleted lines is not supported.
You must change the existing code in this line in order to create a valid suggestion.
Outdated suggestions cannot be applied.
This suggestion has been applied or marked resolved.
Suggestions cannot be applied from pending reviews.
Suggestions cannot be applied on multi-line comments.
Suggestions cannot be applied while the pull request is queued to merge.
Suggestion cannot be applied right now. Please check back later.
Uh oh!
There was an error while loading. Please reload this page.