docs: added cluster, k8s resource browser, k8s resource permission #2787
There are no files selected for viewing
This file contains hidden or bidirectional Unicode text that may be interpreted or compiled differently than what appears below. To review, open the file in an editor that reveals hidden Unicode characters.
Learn more about bidirectional Unicode characters
This file contains hidden or bidirectional Unicode text that may be interpreted or compiled differently than what appears below. To review, open the file in an editor that reveals hidden Unicode characters.
Learn more about bidirectional Unicode characters
| Original file line number | Diff line number | Diff line change |
|---|---|---|
| @@ -0,0 +1,206 @@ | ||
| # Clusters | ||
|
|
||
| Devtron allows you to manage your Kubernetes cluster by: | ||
| * Browsing information of cluster and its resources. | ||
| * Managing the added resources to meet the requirements for high speed and storage capacity. | ||
| * Managing Cluster resources with Kubernetes requests and limits and also individual containers. | ||
| * Debugging a pod or node by connecting to a terminal. | ||
|
|
||
| On the left navigation of Devtron, select `Clusters`. You will find the list of clusters in this section which you have added under [Global Configurations > Clusters & Environments](https://docs.devtron.ai/global-configurations/cluster-and-environments). | ||
|
|
||
| You can also search the cluster in the `Search Clusters` bar. | ||
|
|
||
|  | ||
|
|
||
|
|
||
| | Fields | Description | | ||
| | --- | --- | | ||
| | **Cluster** | User-defined name for the cluster in Devtron. E.g. `default-cluster` | | ||
| | **Connection Status** | Status of the cluster. The status can be either `Successful` or `Failed`. | | ||
| | **Nodes** | Shows the number of nodes in a cluster. | | ||
| | **Node Errors** | Shows the error in nodes. | | ||
| | **K8s Version** | Shows the version of Kubernetes cluster. | | ||
| | **CPU Capacity** | Shows the CPU capacity in your cluster in milicore. E.g., 8000m where 1000 milicore equals to 1 core. | | ||
| | **Memory Capacity** | Shows the memory capacity in your cluster in mebibytes. | | ||
|
|
||
| To see the details of resource allocation and usage of the cluster, click the particular cluster. | ||
|
|
||
| ## Resources | ||
|
|
||
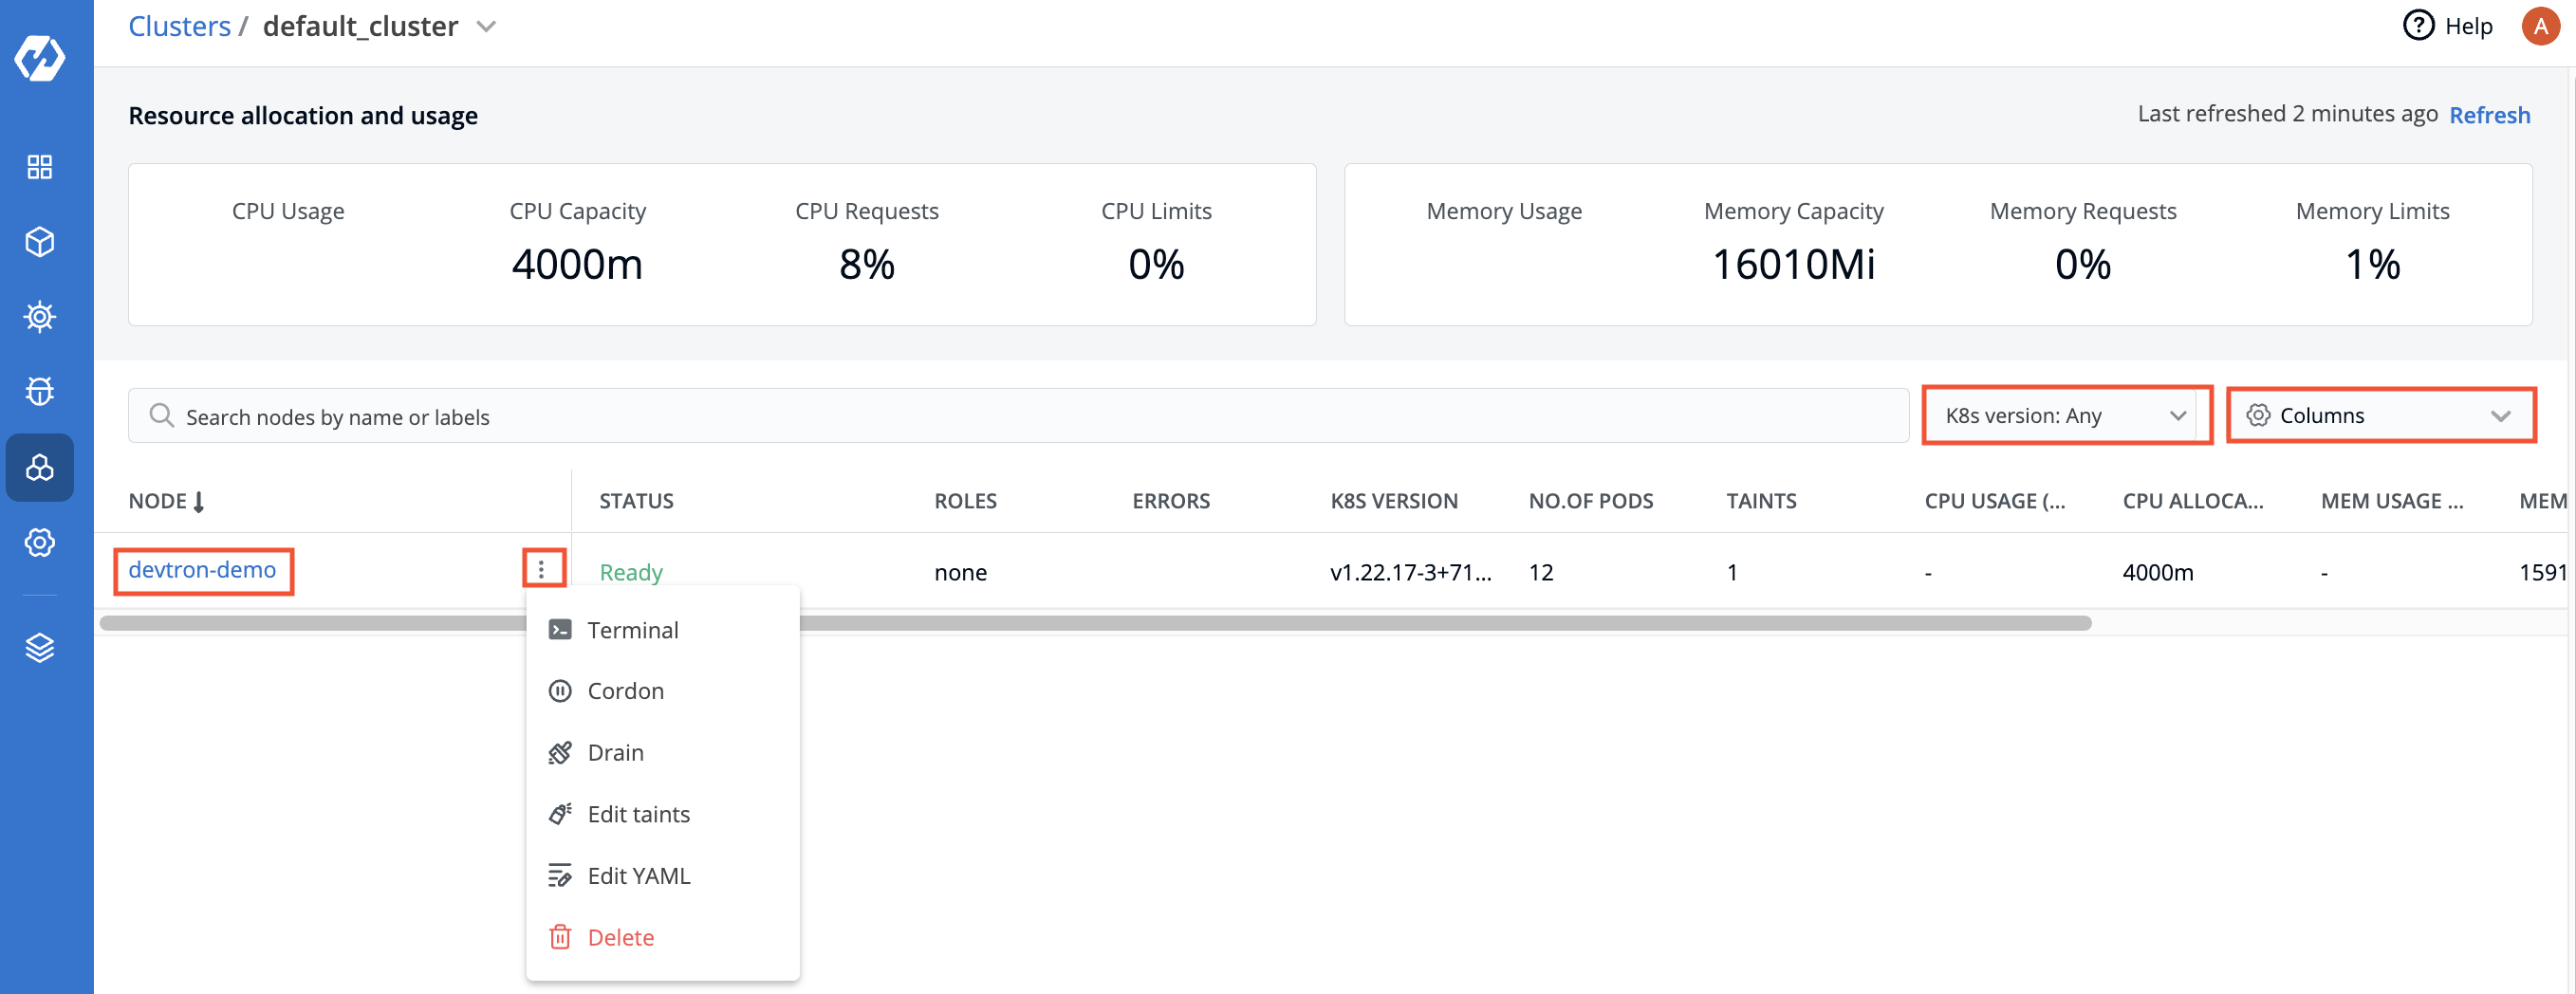
| On the `Resource allocation and usage`, you can see the details of compute resources or resources. | ||
|
|
||
| * CPU resources | ||
| * Memory resources | ||
|
|
||
| If you specify a `request` and `limits` in the container resource manifest file, then the respective values will appear on the `Resource allocation and usage` section. | ||
|
|
||
|  | ||
|
|
||
| ## Nodes | ||
|
|
||
| You can see the list of nodes available in your cluster. Typically you have several nodes in a cluster; in a learning or resource-limited environment, you might have only one node. | ||
|
|
||
| The components on a typical node include the `kubelet`, a `container runtime`, and the `kube-proxy`. | ||
|
|
||
|  | ||
|
|
||
| If you have multiple nodes, you can search a node by name or label in the search bar. | ||
|
|
||
| | Fields | Description | | ||
| | --- | --- | | ||
| | **Node** | User-defined name for the node in Devtron. E.g. `demo-new`.<br>Note: Two nodes cannot have the same name at the same time.</br> | | ||
| | **Status** | Status of a node. It can be either `Ready` or `Not Ready`. | | ||
| | **Roles** | Shows the roles of a node. | | ||
| | **Errors** | Shows the error in nodes. | | ||
| | **K8s Version** | Shows the version of Kubernetes cluster. | | ||
| | **No. of Pods** | Shows the number of namespaces or pods in a node. | | ||
| | **CPU Usage** | Shows the CPU consumption in a node. | | ||
| | **Mem Usage** | Shows the memory consumption in a node | | ||
| | **Age** | Shows the time that the pod has been running since the last restart. | | ||
|
|
||
| To display a parameter of a node, use the `Columns` on the right side, select the parameter you want to display from the drop-down list and click `Apply`. | ||
|
|
||
| ## Manage Nodes | ||
|
|
||
| Your applications run on pods, and pods run on Nodes. But sometimes, Kubernetes scheduler cannot deploy a pod on a Node for several reasons. As an example, node is not ready, node is not reachable, network is unavailable etc. | ||
|
|
||
| Using the Devtron UI, you will be able to: | ||
| * [Debug a node](#debug-a-node) | ||
| * [Cordon a node](#cordon-a-node) | ||
| * [Drain a node](#drain-a-node) | ||
| * [Taint a node](#taint-node) | ||
| * [Configure YAML](#configure-yaml) | ||
| * [Delete a node](#delete-a-node) | ||
|
|
||
| To see the summary of a node, click the specific node. | ||
|
|
||
|  | ||
|
|
||
| ### Debug a Node | ||
|
|
||
| You can debug a node via Terminal by selecting your namespace and image from the list that has all CLI utilities like kubectl, helm, netshoot etc. or can use a custom image, which is publicly available. | ||
|
|
||
|  | ||
|
|
||
| * Go to the `Clusters` section from the left navigation pane. | ||
| * Select your cluster. | ||
| * Search a node by name or label in the search bar. | ||
| * On the node, click the ellipsis button and then click `Terminal`. | ||
| * Debug a node by selecting the terminal shell `bash` or `sh`. | ||
|
|
||
|
|
||
| ### Cordon a Node | ||
|
|
||
| Cordoning a node means making the node unschedulable. After cordoning a node, new Pods cannot be scheduled on this node. | ||
|
|
||
|  | ||
|
|
||
| * On the node, click the ellipsis button and then click `Cordon`. | ||
| * A dialog box with message `Cordoning this node will mark this node as unschedulable. By cordoning a node, you can be sure that no new pods will be scheduled on this node` is displayed. | ||
| * The status of the node shows `SchedulingDisabled` with `Unschedulable` parameter set as `true`. | ||
|
|
||
| Similarly, you can uncordon a node by clicking `Uncordon`. After a node is uncordoned, new Pods can be scheduled on the node. | ||
|
|
||
| ### Drain a Node | ||
|
|
||
| Before performing maintenance on a node, draining a node evicts all of your pods safely from a node. Safe evictions allow the pod’s containers to gracefully terminate and will manage the `PodDisruptionBudgets` you have specified (if relevant). | ||
|
||
|
|
||
| After the node is drained, all Pods (including those managed by DaemonSets) in the node will be automatically drained to other nodes in the cluster, and the drained node will be set to cordoned status. | ||
|
|
||
|  | ||
|
|
||
| * On the node, click the ellipsis button and then click `Drain`. | ||
| * A dialog box with message `Drain will cordon off the node and evict all pods of the node` is displayed. | ||
| * Click `Drain Node`. | ||
|
|
||
| You can also select from the following conditions before draining a node: | ||
|
|
||
| | Name | Usage | | ||
| | --- | --- | | ||
| | **Grace Period** | Period of time in seconds given to each pod to terminate gracefully. If negative, the default value specified in the pod will be used. | | ||
| | **Delete empty directory data** | Enabling this field will delete the pods using empty directory data when the node is drained. | | ||
| | **Disable eviction (use with caution** | Enabling this field will force drain to use delete, even if eviction is supported. This will bypass checking `PodDisruptionBudgets`.<br>Note: Make sure to use with caution.</br> | | ||
| | **Force drain** | Enabling this field will force drain a node even if there are pods that do not declare a controller. | | ||
| | **Ignore DaemonSets** | Enabling this field will ignore DaemonSet-managed pods. | | ||
|
|
||
| ### Taint a Node | ||
|
|
||
| Taints are `key:value` pairs associated with effect. After you add taints to nodes, you can set tolerations on a pod to allow the pod to be scheduled to nodes with certain taints. When you taint a node, it will repel all the pods except those that have a toleration for that taint. A node can have one or many taints associated with it. | ||
|
|
||
| **Note**: Make sure to check taint validations before you add a taint. | ||
|
|
||
|  | ||
|
|
||
| * On the node, click the ellipsis button and then click `Edit taints`. | ||
| * Click `Add taint`. | ||
| * On the `Key` and `Value` fields, enter the `key:value` pairs and select the [taint effect](#taint-effects) from the drop-down list. | ||
| * Click `Save`. | ||
| * You can also delete the added taint by clicking delete button. | ||
|
|
||
| #### Taint Effects | ||
|
|
||
| A taint can produce three possible effects: | ||
|
|
||
| | Effect | Description | | ||
| | --- | --- | | ||
| | **NoSchedule** | The Kubernetes scheduler will only allow scheduling pods that have tolerations for the tainted nodes. | | ||
| | **PreferNoSchedule** | The Kubernetes scheduler will try to avoid scheduling pods that do not have tolerations for the tainted nodes. | | ||
| | **NoExecute** | Kubernetes will evict the running pods from the nodes if the pods do not have tolerations for the tainted nodes. | | ||
|
|
||
| ### Configure YAML | ||
|
|
||
| The config.yaml file contains all the configuration settings that are needed to deploy your cluster. | ||
|
||
|
|
||
|  | ||
|
|
||
| * You can edit or modify the parameters or values of a node by clicking `YAML`. | ||
| * Click `Review Changes` to compare the changes in the YAML file. | ||
| * Click `Update Node`. | ||
|
|
||
|
|
||
| ### Delete a Node | ||
|
|
||
| * Go to the `Clusters` section from the left navigation pane. | ||
|
||
| * Select your cluster. | ||
| * Search a node by name or label in the search bar. | ||
| * On the node, click the ellipsis button and then click `Delete`. | ||
|
|
||
| The node will be deleted from the cluster. | ||
|
|
||
|
|
||
| ## Access Cluster via Terminal for Troubleshooting | ||
|
|
||
| User with [Super admins](https://docs.devtron.ai/global-configurations/authorization/user-access#assign-super-admin-permissions) access can now troubleshoot cluster issues by accessing the cluster terminal from Devtron. You can select an image from the list that has all CLI utilities like kubectl, helm, netshoot etc. or can use a custom image, which is publicly available. | ||
|
|
||
| To troubleshoot a cluster or a specific node in a cluster, click the terminal symbol on the right side. | ||
|
|
||
|  | ||
|
|
||
| * You will see the user-defined name for the cluster in Devtron. E.g. `default-cluster`. | ||
| * In the `Nodes` field, select the node from the drop-down list you want to troubleshoot. E.g. `demo-new`. | ||
| * Select the namespace from the drop-down list which you have added in the [Environment](https://docs.devtron.ai/global-configurations/cluster-and-environments#add-environment) section. | ||
| * Select the image from the drop-down list which includes all CLI utilities or you can use a custom image, which is publicly available. | ||
| * Select the terminal shell from the drop-down list (e.g. `sh`, `bash`) to troubleshoot a node. | ||
|
|
||
|
|
||
| ### Debug Pod | ||
|
|
||
| You can also create pod for debugging which will connect to pod terminal. To find out why the particular pod is not running, you can check `Pod Events` and `Pod Manifest` for details. | ||
|
Contributor
There was a problem hiding this comment. how we are supporting this |
||
|
|
||
| Or you can also use the following commands to show events at the end of the output for the pod: | ||
|
|
||
| ```bash | ||
| kubectl describe pod <podname> | ||
| ``` | ||
|
|
||
| or | ||
|
|
||
| ```bash | ||
| kubectl get events | ||
| ``` | ||
|
|
||
| According to the `Pod Events` messages and `Pod Manifest`, you can debug a pod. | ||
|
|
||
| **Note**: A container can have no or multiple shells running in it. If you are not able to create a successfull connection, try changing the shell, as the container may not have that shell running. | ||
|
|
||
|
|
||
This file contains hidden or bidirectional Unicode text that may be interpreted or compiled differently than what appears below. To review, open the file in an editor that reveals hidden Unicode characters.
Learn more about bidirectional Unicode characters
| Original file line number | Diff line number | Diff line change |
|---|---|---|
| @@ -1,9 +1,9 @@ | ||
| `Authorization` section describes how to authenticate and authorize access to resources, also managing role-based access levels in Devtron. | ||
|
|
||
| Access can be added to a user via: | ||
|
|
||
| * [User Permissions](user-access.md) | ||
|
|
||
| * [Permission Groups](permission-groups.md) | ||
|
|
||
| * [API Tokens](api-tokens.md) |
This file contains hidden or bidirectional Unicode text that may be interpreted or compiled differently than what appears below. To review, open the file in an editor that reveals hidden Unicode characters.
Learn more about bidirectional Unicode characters
Oops, something went wrong.
Add this suggestion to a batch that can be applied as a single commit.
This suggestion is invalid because no changes were made to the code.
Suggestions cannot be applied while the pull request is closed.
Suggestions cannot be applied while viewing a subset of changes.
Only one suggestion per line can be applied in a batch.
Add this suggestion to a batch that can be applied as a single commit.
Applying suggestions on deleted lines is not supported.
You must change the existing code in this line in order to create a valid suggestion.
Outdated suggestions cannot be applied.
This suggestion has been applied or marked resolved.
Suggestions cannot be applied from pending reviews.
Suggestions cannot be applied on multi-line comments.
Suggestions cannot be applied while the pull request is queued to merge.
Suggestion cannot be applied right now. Please check back later.
Uh oh!
There was an error while loading. Please reload this page.