Tutorial Quest #1

The world (some small portion of it) demanded a clock! Set forth on to your first quest -
Another clock? Yeah, but this clock will teach you the basic building blocks that lead to much cooler projects!
An animated clock that changes what background is displayed based on the time of day.
- Basic Qml Types ( Item, AnimatedImage )
- Basic Qml item Attributes
- Basic integration of AppController and a signal handler
- Basic State management
- Basic Behaviors
- Integration of custom a Qml object
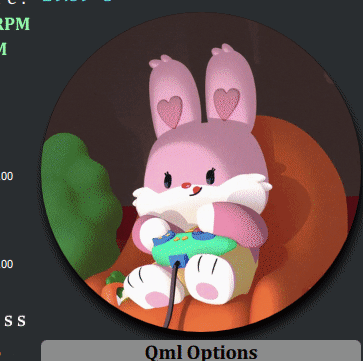
The Clock example that you previously downloaded and installed will be placed over an animated background. The clock is an embedded/child Qml object to the scene. This Qml Scene is your application's world. The Animated Image is a child of the scene as well. Using the AnimatedImage item we will show one of 2 animated backgrounds. The backgrounds could be whatever your imagination leads to but will simply be GIF animations playing on repeat for this tutorial. To spice things up we will add a transition between the two states.
Open the previously downloaded or cloned KZPBase in your text editor (seen using Qt Creator below). Use the Kraken Z Playground application to Set Qml to the KZPBase main.qml.

- Create your own directory in the top project directory KZPBase/yourproject
- In that directory create a Qml file (its just a text file ending with .qml) and name it what you want (tutorial.qml is used in the images).
- Add a root Item
import QtQuick 2.15
Item {
    id:rootItem
    anchors.fill: parent
}1. Add an AnimatedImage item and set the source attribute to the bunny gamer asset
import QtQuick 2.15
Item {
    id:rootItem
    anchors.fill: parent
    AnimatedImage{
        anchors.fill: parent
        source:"gamer_bunny.gif"
        speed:.8
    }
}
Oh no! Something went wrong! In this case it is a missing image file. But I should let you know this guide exists to help understand errors you might encounter as you build.
3. To fix the problem above download the bunny and penguin assets and include them in the project directory.
- Or find your own animations 🧐
import "../../Clock/" as Wall * examples/
* Clock/Clock.qml
* KZPTutorial(Git Directory)/KZPTutorial/tutorial.qml
import QtQuick 2.15
import "../../Clock/" as Wall
Item {
    id:rootItem
    anchors.fill: parent
    AnimatedImage{
        anchors.fill: parent
        source:"gamer_bunny.gif"
        speed:.8
    }
    Wall.Clock{
        rootItem.height:90
        rootItem.width:90
        anchors{
            top:parent.top
            left:parent.left
            margins:80
        }
    }
}
3. Using anchors and the rootItem alias defined in Clock.qml, align and size the Clock to fit our scene.
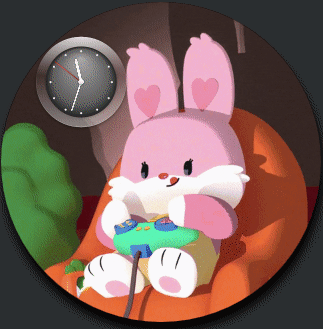
Well that was easy enough! Better yet, you can change the size and position of the embedded clock item. Because internally the clock item uses width and height to scale it's own children items, the whole item scales evenly. This wall clock could be any qml item. Just create a Qml file (ItemName.qml) and then include the file folder path. The object will be available using the name of the file.
Introduction to States Qt5 QtQuick States
Our state requirements are quite simple
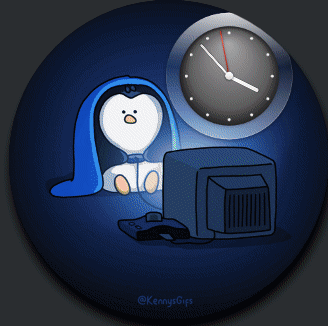
- bunny state
- penguin state
You are looking at the bunny state in the GIFs above.
state:"" // unnamed, bunny state
states:[
State {
extend:"" // start with bunny state
name:"penguin" // used to set the state, rootItem.state = "penguin"
}
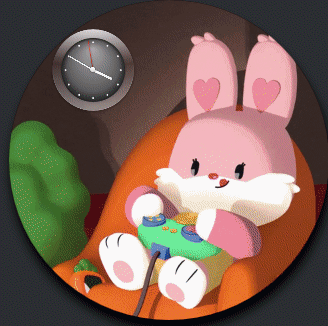
]Now we need to codify our changes. This is a good time to stop and talk about design. My design for this tutorial was intended to be simple. But not as simple as changing the existing animated image source to penguin. Instead, we will animate a transition from each state using behaviors. When the clock moves instead of appearing one frame later in the new position, it will animate into place. In a similar manner, the animations will fade into each other.
To animate the clock, we will add behaviors to the x, y, rootItem.width, rootItem.height properties.
 Wall.Clock{
        id:clock
        rootItem.height:90 // initialized values
        rootItem.width:90
        x: 84
        y: 70
        Behavior on rootItem.height {
            NumberAnimation{duration:1500} // Qml Number Animation
        }
        Behavior on rootItem.width {
            NumberAnimation{duration:1500}
        }
        Behavior on x {
            NumberAnimation {duration:2000}
        }
        Behavior on y {
            NumberAnimation {duration:2000}
        }
    }
Now when the clock's properties are changed via code in our PropertyChanges qml declaration, the changes will animate over a duration.
Using the opacity property and the same Behavior and NumberAnimation objects, fade the two elements over a duration
    AnimatedImage{
        id: penguin
        anchors.fill: parent
        source:"game_penguin.gif"
        speed:.8
        opacity:0
        Behavior on opacity {
            NumberAnimation{duration:2500}
        }
    }
    AnimatedImage{
        id:bunny
        anchors.fill: parent
        source:"gamer_bunny.gif"
        speed:.8
        opacity:1
        Behavior on opacity {
            NumberAnimation{duration:2500}
        }
    }
At this point if you save and reload in KZP, nothing will look to have changed. We will now add the state logic to define how each state will look.
Our state definitions have grown to include PropertyChanges. Now animating from bunny to penguin and similarly from penguin to bunny, will happen automatically on the change of the rootItems state property.
states:[
        State{
            extend:""
            name:"bunny"
            PropertyChanges{
                target:penguin
                opacity:0
            }
            PropertyChanges{
                target:bunny
                opacity:1
            }
            PropertyChanges{
                target:clock
                x:84
                y:70
                rootItem.height:90
                rootItem.width:90
            }
        },
        State {
            extend:"" // start with bunny state
            name:"penguin" // used to set the state, rootItem.state = "penguin"
            PropertyChanges{
                target:penguin
                opacity:1
            }
            PropertyChanges{
                target:bunny
                opacity:0
            }
            PropertyChanges{
                target:clock
                x:220
                y:76
                rootItem.height:140
                rootItem.width:140
            }
        }
]We could add a handler method to the Clock.onMinuteChanged signal to transition our state, but it is more likely you will want to handle the onDraw signal from AppController. This allows you to adjust your animations/changes dynamically based on the draw rate. When a user changes the frame delay in KZP the rate onDraw is called will match it.
    Connections{
        target: AppController
        function onDraw(){
            rootItem.state = clock.minutes % 2 == 0 ? "bunny":"penguin"
        }
    }
That is the basics of your first Kraken Z Prog! Try something of your own, change the background of the clock to a smiley face or add a digital one. You can find the complete example source code