FORK By Jumitti
Thanks to JMR & LupusE

First of all, this fork will become obsolete very quickly. It modifies essential files for the proper functioning of the next updates. It does not cause any problem with my Flipper Zero but if one day the modified files are modified in real versions of the firmware it will be necessary to redo everything. To understand exactly what this fork does and how to see below
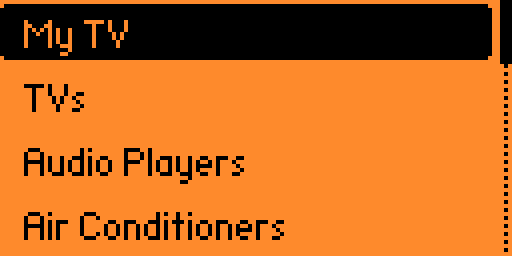
The "Saved Remotes" function is very useful but a bit "archaic". The interface is not unpleasant but when we see that of "Universal Remotes" we would like to have the same thing for our own remote controls. It's much more intuitive and faster.
Then, the force_mod (which makes it possible to emulate several IRs in a row) is not possible with the "Saved Remotes"
The "Universal Remotes" remote controls take time to send the information if you have to send several signals before having the right one.
Finally, I want to send a series of IR (force_mod) and the only way to do that is with "Universal Remotes"
-
Create a remote control in "Universal Remotes"
-
Create a library associated with this remote control
You need to use Flpper Build Tool (see Documentation below). You will then install a developer firmware on your Flipper Zero
For a better understanding, I invite you to compare the files that I modified or added with the originals. I will do my best to explain as simply as possible.
All new/changes will be with the name "My TV". You can easily change this name for your own project
-
Edit in
infrared_scene_config.h(/applications/main/infrared/scenes/infrared_scene_config.h)- Line added (order is not important):
ADD_SCENE(infrared, universal_mytv, UniversalMyTV)
This line is necessary for the IR application to recognize our Universal Remote
-
Edit in
infrared_scene_universal.c(/applications/main/infrared/scenes/infrared_scene_universal.c)WARNING, the order of the lines is important
- Line added in
typedef enumblock:
SubmenuIndexUniversalMyTV
- Block added in
void infrared_scene_universal_on_enter(void* context)block:
submenu_add_item(
    submenu,
    "My TV",
    SubmenuIndexUniversalMyTV,
    infrared_scene_universal_submenu_callback,
    context);
"My TV" is the name that will be displayed
- Block added and edit in
bool infrared_scene_universal_on_event(void* context, SceneManagerEvent event)block (section "if"):
if(event.type == SceneManagerEventTypeCustom) {
    if(event.event == SubmenuIndexUniversalMyTV) {
        scene_manager_next_scene(scene_manager, InfraredSceneUniversalMyTV);
        consumed = true;
    } else if(event.event == SubmenuIndexUniversalTV) {
        scene_manager_next_scene(scene_manager, InfraredSceneUniversalTV);
        consumed = true;
    } else if(event.event == SubmenuIndexUniversalAC) {
        scene_manager_next_scene(scene_manager, InfraredSceneUniversalAC);
        consumed = true;
    } else if(event.event == SubmenuIndexUniversalAudio) {
        scene_manager_next_scene(scene_manager, InfraredSceneUniversalAudio);
        consumed = true;
This edit is needed for the IR app to know how to handle our Universal Remote
This allows to have the force_mod, the interface and the name
- Line added in
-
Create
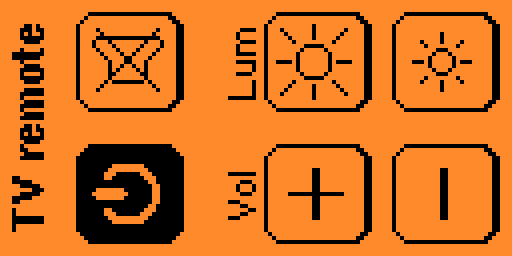
infrared_scene_universal_mytv.cfile in/applications/main/infrared/scenes/:#include "../infrared_i.h" #include "common/infrared_scene_universal_common.h" void infrared_scene_universal_mytv_on_enter(void* context) { infrared_scene_universal_common_on_enter(context); Infrared* infrared = context; ButtonPanel* button_panel = infrared->button_panel; InfraredBruteForce* brute_force = infrared->brute_force; infrared_brute_force_set_db_filename(brute_force, EXT_PATH("infrared/assets/mytv.ir")); button_panel_reserve(button_panel, 2, 3); uint32_t i = 0; button_panel_add_item( button_panel, i, 0, 0, 3, 19, &I_Power_25x27, &I_Power_hvr_25x27, infrared_scene_universal_common_item_callback, context); infrared_brute_force_add_record(brute_force, i++, "Power"); button_panel_add_item( button_panel, i, 1, 0, 36, 19, &I_Mute_25x27, &I_Mute_hvr_25x27, infrared_scene_universal_common_item_callback, context); infrared_brute_force_add_record(brute_force, i++, "Mute"); button_panel_add_item( button_panel, i, 0, 1, 3, 66, &I_Vol_up_25x27, &I_Vol_up_hvr_25x27, infrared_scene_universal_common_item_callback, context); infrared_brute_force_add_record(brute_force, i++, "Vol_up"); button_panel_add_item( button_panel, i, 1, 1, 36, 66, &I_HeatHi_25x27, &I_HeatHi_hvr_25x27, infrared_scene_universal_common_item_callback, context); infrared_brute_force_add_record(brute_force, i++, "Lum_up"); button_panel_add_item( button_panel, i, 0, 2, 3, 98, &I_Vol_down_25x27, &I_Vol_down_hvr_25x27, infrared_scene_universal_common_item_callback, context); infrared_brute_force_add_record(brute_force, i++, "Vol_dn"); button_panel_add_item( button_panel, i, 1, 2, 36, 98, &I_HeatLo_25x27, &I_HeatLo_hvr_25x27, infrared_scene_universal_common_item_callback, context); infrared_brute_force_add_record(brute_force, i++, "Lum_dn"); button_panel_add_label(button_panel, 6, 11, FontPrimary, "TV remote"); button_panel_add_label(button_panel, 9, 64, FontSecondary, "Vol"); button_panel_add_label(button_panel, 39, 64, FontSecondary, "Lum"); view_set_orientation(view_stack_get_view(infrared->view_stack), ViewOrientationVertical); view_dispatcher_switch_to_view(infrared->view_dispatcher, InfraredViewStack); infrared_show_loading_popup(infrared, true); bool success = infrared_brute_force_calculate_messages(brute_force); infrared_show_loading_popup(infrared, false); if(!success) { scene_manager_next_scene(infrared->scene_manager, InfraredSceneErrorDatabases); } } bool infrared_scene_universal_mytv_on_event(void* context, SceneManagerEvent event) { return infrared_scene_universal_common_on_event(context, event); } void infrared_scene_universal_mytv_on_exit(void* context) { infrared_scene_universal_common_on_exit(context); }
This file allows to create our Universal Remote as well as to manage the interface and to modify it.
WARNING! the x,y coordinates are in the direction of the remote control
- Directory of the library:
Mine is mytv.ir (line:
infrared_brute_force_set_db_filename(brute_force, EXT_PATH("infrared/assets/mytv.ir"))) - Float tittles:
button_panel_add_label(button_panel, 6, 11, FontPrimary, "TV remote");
button_panel_add_label(button_panel, 9, 64, FontSecondary, "Vol");
button_panel_add_label(button_panel, 39, 64, FontSecondary, "Lum");
- Button and name:
if you want the list of icons or make your own it's in this folder: assets/icons (infrared for specifiques icons)
button_panel_add_item(
    button_panel,
    i,
    0,
    2,
    3,
    98,
    &I_Vol_down_25x27,
    &I_Vol_down_hvr_25x27,
    infrared_scene_universal_common_item_callback,
    context);
infrared_brute_force_add_record(brute_force, i++, "Vol_dn");
- Directory of the library:
Mine is mytv.ir (line:
The easiest step... but the longest! My .ir library is mytv.ir (defined above ; see "Directory of the library")
- Create a "Saved Remotes" with the IRs you want with Flipper Zero
- Edit the .ir by replacing "signals" by "library" (line 1) (WARNING ! When editing the .ir, remember to put the right names assigned to the corresponding buttons ; see above "Button and name")
- Put the .ir file in assets
This file is very similar to the files you can create with "Saved Remotes". It lets the remote know what to do and how.
here is the code of my .ir file
Filetype: IR library file
Version: 1
#
name: Power
type: parsed
protocol: NEC
address: 04 00 00 00
command: 08 00 00 00
#
name: Lum_dn
type: parsed
protocol: NEC
address: 04 00 00 00
command: 43 00 00 00
#
name: Lum_dn
type: parsed
protocol: NEC
address: 04 00 00 00
command: 44 00 00 00
#
name: Lum_dn
type: parsed
protocol: NEC
address: 04 00 00 00
command: 44 00 00 00
#
name: Lum_dn
type: parsed
protocol: NEC
address: 04 00 00 00
command: 40 00 00 00
#
name: Lum_dn
type: parsed
protocol: NEC
address: 04 00 00 00
command: 40 00 00 00
#
name: Lum_dn
type: parsed
protocol: NEC
address: 04 00 00 00
command: 44 00 00 00
#
name: Lum_dn
type: parsed
protocol: NEC
address: 04 00 00 00
command: 43 00 00 00
#
name: Lum_up
type: parsed
protocol: NEC
address: 04 00 00 00
command: 43 00 00 00
#
name: Lum_up
type: parsed
protocol: NEC
address: 04 00 00 00
command: 44 00 00 00
#
name: Lum_up
type: parsed
protocol: NEC
address: 04 00 00 00
command: 44 00 00 00
#
name: Lum_up
type: parsed
protocol: NEC
address: 04 00 00 00
command: 41 00 00 00
#
name: Lum_up
type: parsed
protocol: NEC
address: 04 00 00 00
command: 41 00 00 00
#
name: Lum_up
type: parsed
protocol: NEC
address: 04 00 00 00
command: 44 00 00 00
#
name: Lum_up
type: parsed
protocol: NEC
address: 04 00 00 00
command: 43 00 00 00
#
name: Mute
type: parsed
protocol: NEC
address: 04 00 00 00
command: 09 00 00 00
#
name: Vol_up
type: parsed
protocol: NEC
address: 04 00 00 00
command: 02 00 00 00
#
name: Vol_dn
type: parsed
protocol: NEC
address: 04 00 00 00
command: 03 00 00 00
As you can see, there are several "lum_dn" and "lum_up". They are stored in the exact order of execution to -> go to the settings of my TV -> press the arrows -> select the right brightness -> exit the settings. This allows to make a macro for the IRs
- Flipper Zero Official Website. A simple way to explain to your friends what the Flipper Zero can do
- Flipper Zero Firmware Update. Improvements for your dolphin: latest firmware releases, upgrade tools for PC and Mobile devices
- User Documentation. Learn more about your dolphin: specs, usage guides, and everything that you wanted to ask
Our main goal is to build a healthy, sustainable community around the Flipper and be open to any new ideas and contributions. We also have some rules and taboos here, so please read this page and our Code Of Conduct carefully.
The best place to search for answers is our User Documentation. If you can't find the answer there, you can check our Discord Server or our Forum.
If you've found an issue and want to report it, please check our Issues page. Make sure that the description contains information about the firmware version you're using, your platform, and the proper steps to reproduce the issue.
Before opening a PR, please confirm that your changes must be contained in the firmware. Many ideas can easily be implemented as external applications and published in the Flipper Application Catalog (coming soon). If you are unsure, you can ask on the Discord Server or the Issues page, and we'll help you find the right place for your code.
Also, please read our Contribution Guide, and our Coding Style, and ensure that your code is compatible with our project License.
Finally, open a Pull Request and ensure that CI/CD statuses are all green.
The Flipper Zero Firmware is written in C, with some bits and pieces written in C++ and armv7m assembly languages. An intermediate level of C knowledge is recommended for comfortable programming. For Flipper applications, we support C, C++, and armv7m assembly languages.
Supported development platforms:
- Windows 10+ with PowerShell and Git (x86_64)
- macOS 12+ with Command Line tools (x86_64, arm64)
- Ubuntu 20.04+ with build-essential and Git (x86_64)
Supported in-circuit debuggers (optional but highly recommended):
- Flipper Zero Wi-Fi Development Board
- ST-Link
- J-Link
Everything else will be taken care of by Flipper Build System.
Ensure that you have enough space and clone source code with Git:
git clone --recursive https://github.com/flipperdevices/flipperzero-firmware.gitBuild firmware using Flipper Build Tool:
./fbtConnect your in-circuit debugger to the Flipper and flash firmware using Flipper Build Tool:
./fbt flashEnsure that your Flipper is working, connect it using a USB cable and flash firmware using Flipper Build Tool:
./fbt flash_usb- Flipper Build Tool - building, flashing, and debugging Flipper software
- Applications, Application Manifest - developing, building, deploying, and debugging Flipper applications
- Hardware combos and Un-bricking - recovering your Flipper from most nasty situations
- Flipper File Formats - everything about how Flipper stores your data and how you can work with it
- Universal Remotes - contributing your infrared remote to the universal remote database
- Firmware Roadmap
- And much more in the Documentation folder
- Discord: flipp.dev/discord
- Website: flipperzero.one
- Forum: forum.flipperzero.one
- Kickstarter: kickstarter.com
applications- Applications and services used in firmwareassets- Assets used by applications and servicesfuri- Furi Core: OS-level primitives and helpersdebug- Debug tool: GDB-plugins, SVD-file and etcdocumentation- Documentation generation system configs and input filesfirmware- Firmware source codelib- Our and 3rd party libraries, drivers, etc.scripts- Supplementary scripts and python libraries home
Also, pay attention to ReadMe.md files inside those directories.