Git is a tool for managing files and versions of files. It is a Version Control System. It allows you to keep track of changes. You are going to be using Git to manage your course work and keep your copy of the lecture notes and files up to date. Git can help you do very complex task with files. We are going to keep it simple.
A Version Control System is good for Collaborations, Storing Versions, Restoring Previous Versions, and Managing Backups.
Using a Version Control System makes it possible to edit a document with others without the fear of overwriting someone's changes, even if more than one person is working on the same part of the document. All the changes can be merged into one document. These documents are all stored one place.
A Version Control System allows you to save versions of your files and to attach notes to each version. Each save will contain information about the lines that were added or altered.
Since you are keeping track of versions, it is possible to revert all the files in a project or just one file to a previous version.
A Version Control System makes it so that you work locally and sync your work remotely. This means you will have a copy of your project on your computer and the Version Control System Server you are using.
git is the Version Control System we will be using for tracking changes in our files.
GitHub is the Version Control System Server we will be using. They provide free account for all public projects.
A repository is a project that contains all of the project files, and stores each file's revision history. Repositories can have multiple collaborators. Repositories usually have two components, one remote and one local.
Let's Do It!
Follow Steps 1 and 2 to create the remote repository. Follow Step 3 to create your local repository and link it to the remote repository.
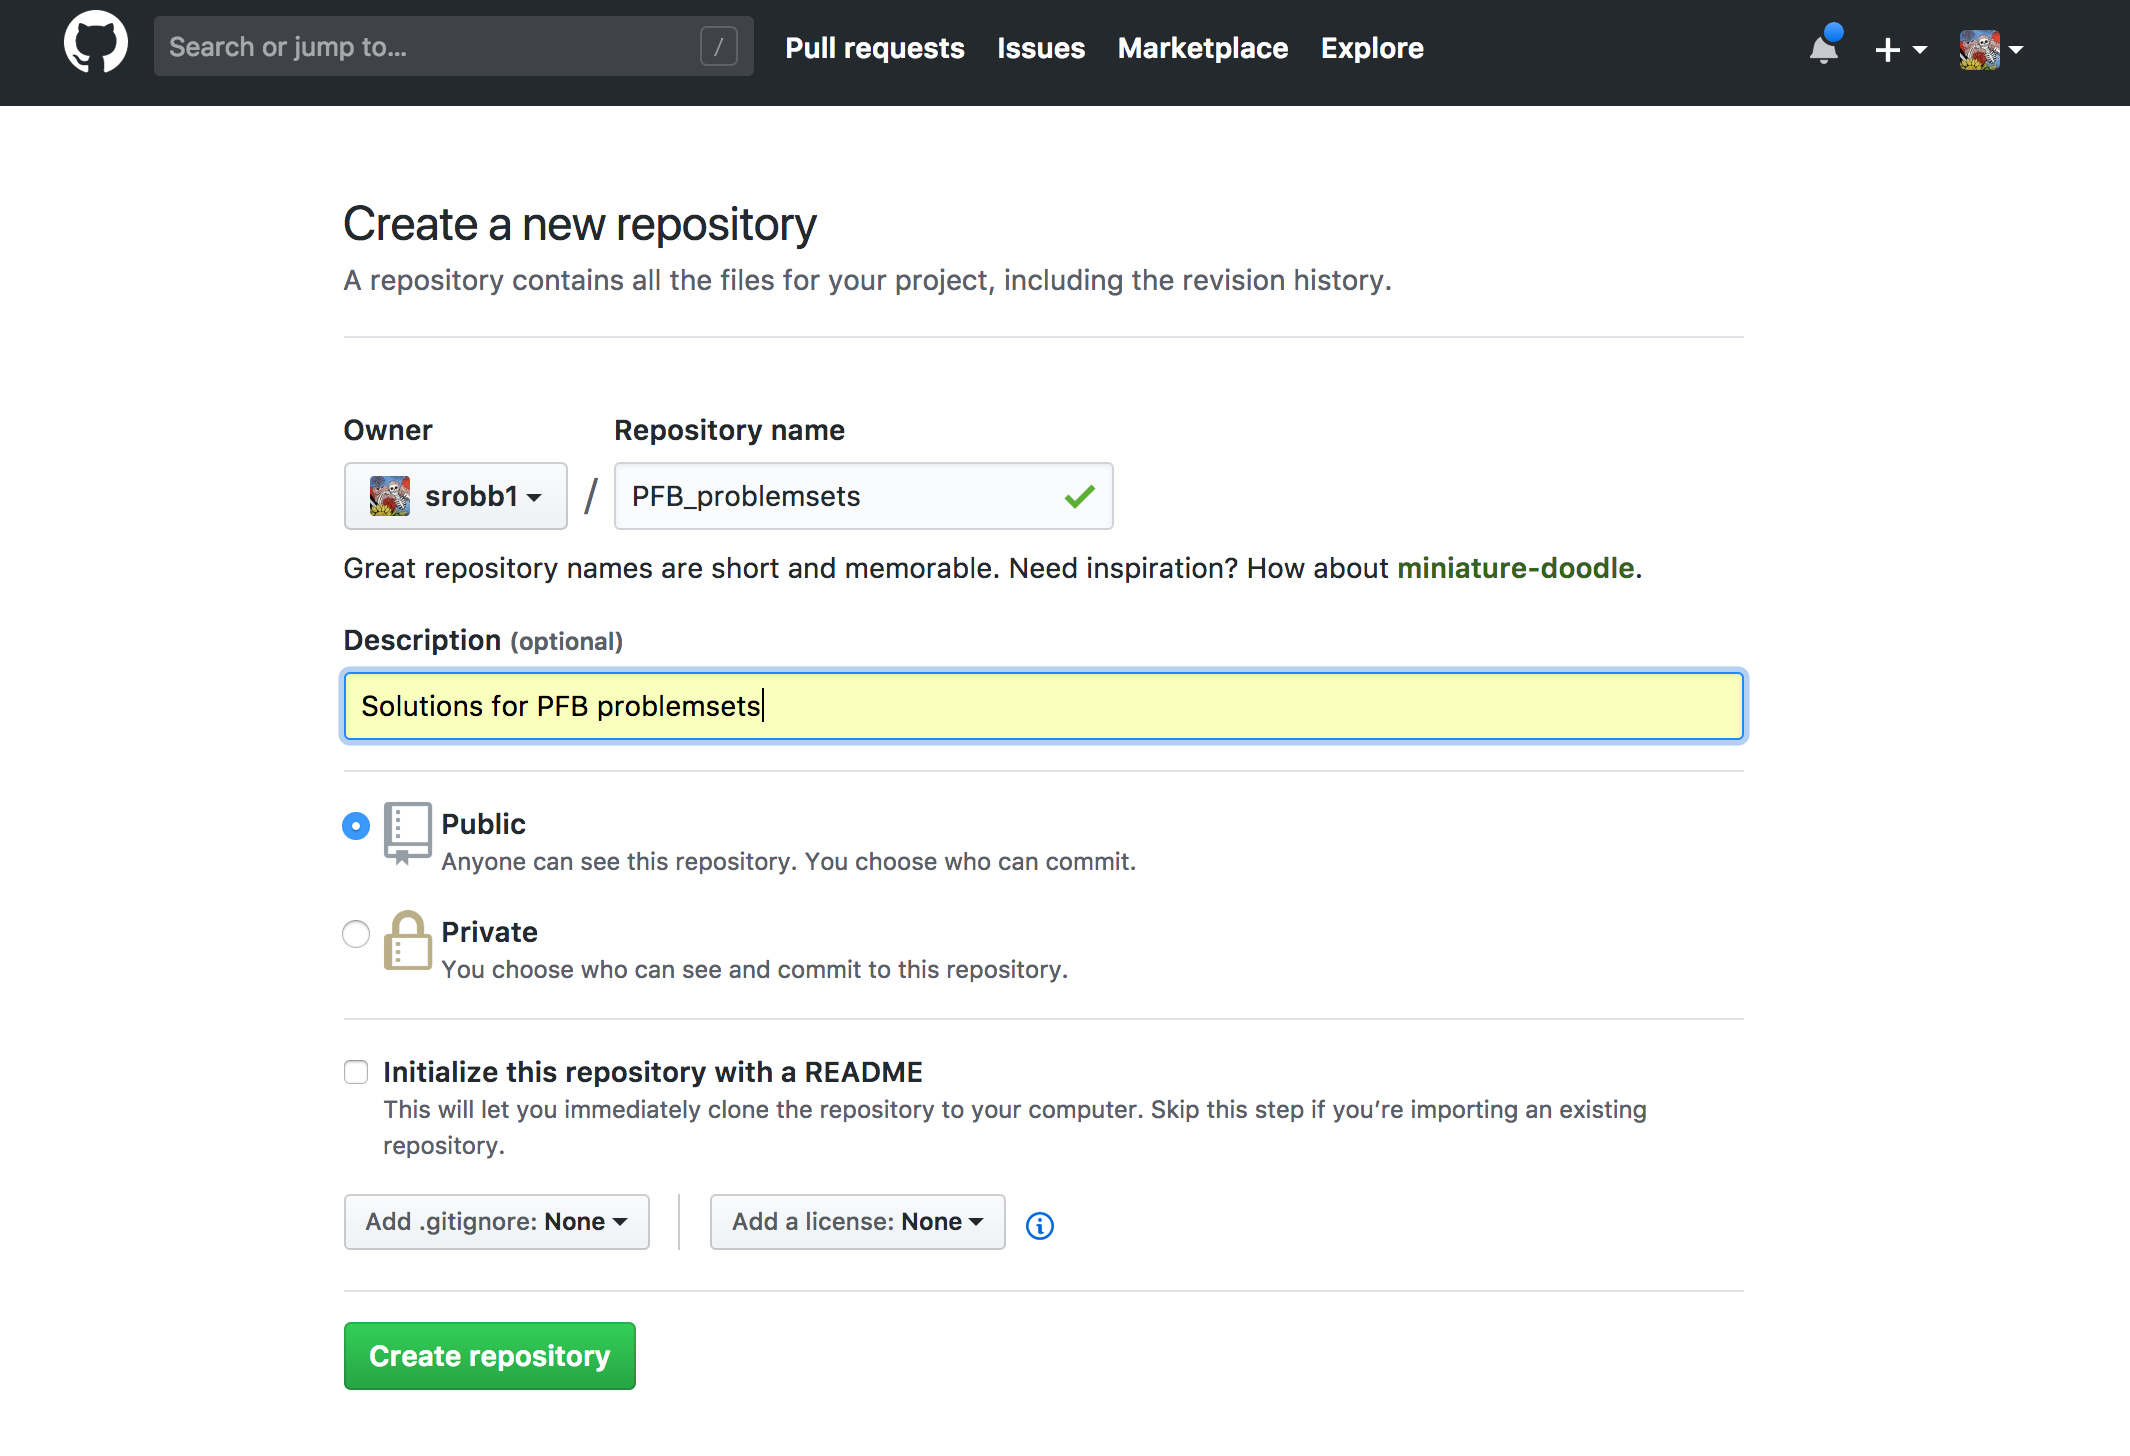
- Navigate to GitHub --> Create Account / Log In --> Go To Repositories --> Click 'New'

- Add a name (i.e., PFB_problemsets) and a description (i.e., Solutions for PFB Problem Sets) and click "Create Repository"
- Create a directory on your computer and follow the instructions provided.
- Open your terminal and navigate to the location where you want to put a directory for your problem sets
- Create a new directory directory (i.e., PFB_problemsets)
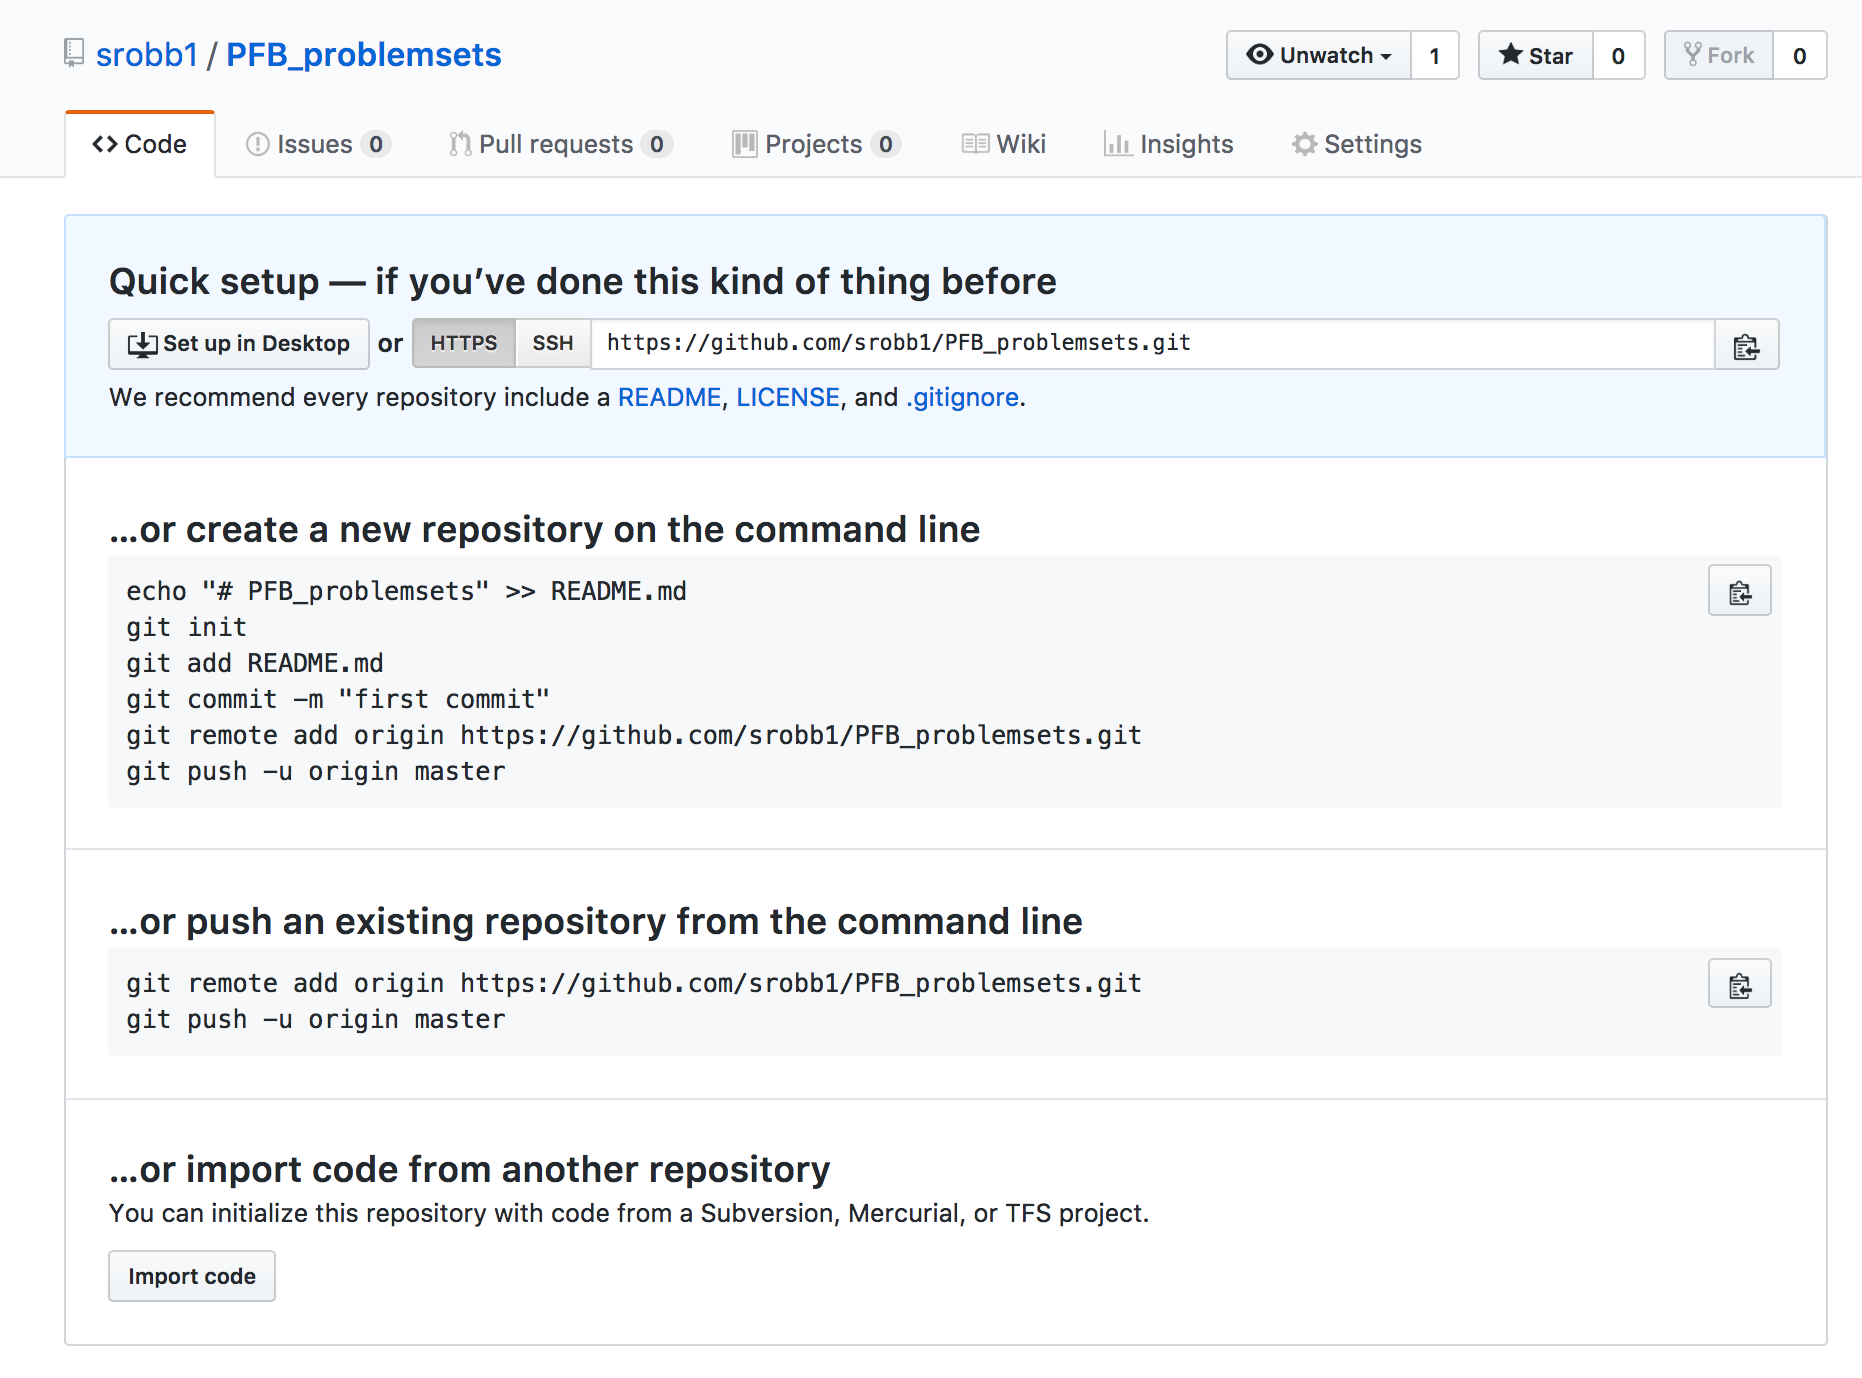
- Follow the instructions provided when you created your repository. These are my instructions; yours will be different.
echo "# PFB_problemsets" >> README.md
git init
git add README.md
git commit -m "first commit"
git remote add origin https://github.com/srobb1/PFB_problemsets.git
git push -u origin master
You now have a repository!
Let's back up a bit and talk more about git and about these commands. For basic git use, these are almost all the commands you will need to know.
Every git repository has three main elements called trees:
- The Working Directory contains your files
- The Index is the staging area
- The HEAD points to the last commit you made.
There are a few new words here. We will explain them as we go
| command | description |
|---|---|
git init |
Creates your new local repository with the three trees (local machine) |
git remote add remote-name URL |
Links your local repository to a remote repository that is often named origin and is found at the given URL |
git add filename |
Propose changes and add file(s) with changes to the index or staging area (local machine) |
git commit -m 'message' |
Confirm or commit that you really want to add your changes to the HEAD (local machine) |
git push -u remote-name remote-branch |
Upload your committed changes in the HEAD to the specified remote repository to the specified branch |
Let's Do it!
- Make sure you are in your local repository
- Create a new file with nano:
nano git_exercises.txt - Add a line of text to the new file.
- Save (control + o) and Exit (control + x)
- (Add) Stage your changes.
git add git_exercises.txt - (Commit) Become sure you want your changes.
git commit -m 'added a line of text' - (Push) Sync/Upload your changes to the remote repository.
git push origin master
That is all there is to it! There are more complicated things you can do, but we won't get into those. You will know when you are ready to learn more about git when you figure out there is something you want to do but don't know how. There are thousands of online tutorials for you to search and follow.
Sometimes you want to download and use someone else's repository.
Let's clone the course material.
Let's do it!
- Go to our PFB2018 GitHub Repository
- Click the 'Clone or Download' Button
- Copy the URL ~Clone PFB2018
- Clone the repository to your local machine
git clone https://github.com/prog4biol/pfb2018.git
Now you have a copy of the course material on your computer!
If changes are made to any of these files in the online, remote repository, and you want to update your local copy, you can pull the changes.
git pull
| command | description |
|---|---|
git pull |
To get changes from the remote into your local copy |
If you are ever wondering what do you need to add to your remote repository use the git status command. This will provide you with a list of files that have been modified, deleted, and those that are untracked. Untracked files are those that have never been added to the staging area with git add
| command | description |
|---|---|
git status |
To see a list of files that have been modified, deleted, and those that are untracked |
You will KNOW if you need to use these features of git.